


117
“Memory Stick” Operations
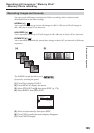
Superimposing a still image in “Memory Stick” on an image
– MEMORY MIX
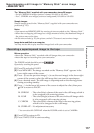
The “Memory Stick” supplied with your camcorder stores 20 images:
– For M. CHROM: 18 images (such as a frame) 101-0001 to 101-0018
– For C. CHROM: two images (such as a background) 101-0019 to 101-0020
Sample images
Sample images stored in the “Memory Stick” supplied with your camcorder are
protected (p. 135).
Notes
•You cannot use MEMORY MIX for moving pictures recorded on the “Memory Stick.”
•When the overlapping still image has a large amount of white, the thumbnail image of
the picture may not be clear.
•In the mirror mode (p. 29), the picture on the LCD screen is not a mirror-image.
Image data modified on a computer
You may not be able to play modified images back with your camcorder.
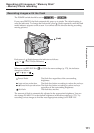
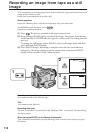
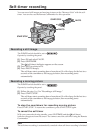
Recording a superimposed image to the tape
Before operation
•Insert the “Memory Stick” recorded with still images into your camcorder.
•Insert the tape for recording into your camcorder.
The POWER switch should be set to .
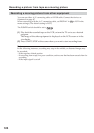
Operate by touching the panel.
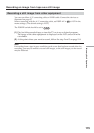
(1) Press FN and select PAGE2.
(2) Press MEM MIX. The image recorded on the “Memory Stick” appears in the
lower right corner of the screen.
(3) Press – (to see the previous image)/+ (to see the next image) in the lower right
corner of the screen to select the still image that you want to superimpose.
(4) Press a desired mode. The still image is superimposed on the moving picture
during recording standby.
(5) Press –/+ in the lower left corner of the screen to adjust the effect, then press
OK to return to PAGE2.
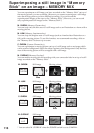
M. CHROM – The color (blue) scheme of the area in the still image which is
to be swapped with a moving picture
M. LUMI – The color (bright) scheme of the area in the still image which
is to be swapped with a moving picture
C. CHROM – The color (blue) scheme of the area in the moving picture
which is to be swapped with a still image
M. OVERLAP* – No adjustment necessary
* You can select M. OVERLAP when the POWER switch is set to CAMERA.
(6) Press EXIT to return to FN.
(7) Press START/STOP to start recording.