


Appendix A: Media server access
94 Installing and Configuring the Avaya S8500 Media Server February 2007
Customers can set up their own logins to access Avaya media servers. You must have
superuser permission to create or change logins and passwords. NOTE: do not start login IDs
with a number. For more information, see the Avaya Communication Manager Basic
Administration Quick Reference (03-300363).
Configuring the network for Windows 2000 and XP
!
Important:
Important: Write down the original settings for use in case you need to revert to the original
configuration.
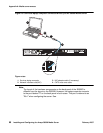
1. On your computer desktop, right-click My Network Places and left-click Properties to
display the Network Connections window.
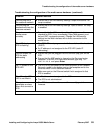
Windows 2000 or Windows XP should automatically detect the Ethernet card in your
system and create a LAN connection. More than one connection might appear.
2. Right-click on the correct Local Area Connection and left-click Properties to display the
Local Area Connection Properties dialog box.
3. Select Internet Protocol (TCP/IP).
4. Click Properties to display the Internet Protocol (TCP/IP) Properties dialog box.
5. On the General tab, select Use the following IP address.
6. Make a note of any IP addresses or other entries that you have to clear. You might need to
restore them later to connect to another network
Enter the following:
● IP address: 192.11.13.5
● Subnet mask: 255.255.255.252
7. Select Use the following DNS server addresses. The entries for Preferred DNS server
and Alternate DNS server should both be blank.
8. Click Advanced at the bottom of the dialog box to display the Advanced TCP/IP Settings
dialog box.
9. Click the DNS tab. Ensure no DNS server is administered. The address field should be
blank.
10. Click OK, OK, and Close to close all the windows.