


7. Basic set up procedures
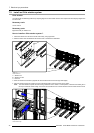
7.10 Build up a floor mounted OLite rental display
Floor mounted OLite display
A floor mounted OLite rental display is built upon OLite rental feet. The OLite tiles are placed successively from left to right (or right
to left) and row by row.
WARNING: The foot beams on which the OLite rental feet are mounted must be firmly attached to the ground
with fixings, or ballast, or both as necessary before mounting the OLite tiles upon the rental feet. This to
prevent possible tipping.
WARNING: An OLite rental display higher than 2 tiles requires a stacker system.
WARNING: The maximum height of a base stand OLite display is 12 tiles high.
Necessary tools
• Hoisting equipment.
• OLite single truss beam.
How to build up a floor mounted OLite rental display ?
1. Ensure you understand and follow all the safety guidelines, safety instructions and warnings mentioned in the chapter "Safety",
page 3 of this manual.
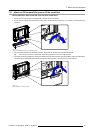
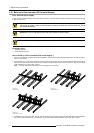
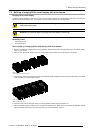
2. Install the first row of OLite tiles successively from left to right (or right to left). Ensure each tile is attached and locked correctly
with the others and with the OLite rental feet. See "Attach an OLite rental tile
upon an OLite rental foot", page 45 and "Attach
OLite rental tiles next to each other", page 47.
Note: The OLite rental tile final approach must be 45 degrees for flush fitting.
Image 7-20
Install first tile.
Image 7-21
Install second tile.
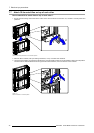
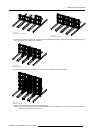
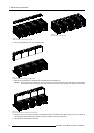
Image 7-22
Install first row of tiles.
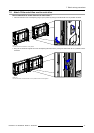
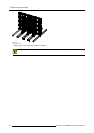
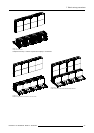
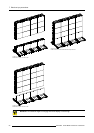
3. Install the second row of OLite tiles. Ensure each tile is attached and locked correctly with the OLite tiles below and besides.
S
ee "Attach OLite rental tiles on top of each other", page 46 and "Attach OLite rental tiles next to each other", page 47.
50
R5976832 OLITE RENTAL DISPLAY 29/05/2007