


170
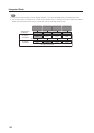
Integrator Mode
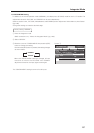
INTEGRATOR INPUT1
CHANGE
SCREEN SETUP OPTION
FAN CONTROL
OSD
FRONT I ND ICATOR
COLOR MODE
PRO USE
FRC
PICTURE
:
:
:
:
SET
EXIT
MENU
AUTO
NORMAL
ON
ON
3
ON
OFF
2
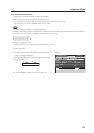
Retake at a TV studio
(PAL camera)
49.67
Retake at a TV studio
(NTSC camera)
FILM re-shoot for a movie
(48 Hz camera)
59.94
60.00
60.00
49.54
50.08
49.861
59.87
60.02
60.00
48.003
48.014
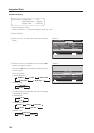
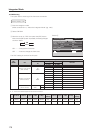
*1, 2: The recommended signal formats are shown below.
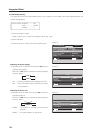
Dot Clock
H-Period
H-Sync
H-BP
V-Period
H-sync
polarity
OFF
*1 52MHz
1344dot
nega
nega
806line
802line
V-Sync
4line
4line
V-BP
31line
29line
V-Disp
768line
768line
134dot
118dot
*2 65MHz
1688dot
163dot
242dot
H-Disp
1024dot
1280dot
V-sync
polarity
nega
nega
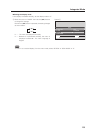
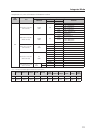
FRC
MODE
Use
PC
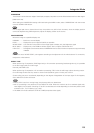
Horizontal frequency
Fh (kHz)
Vertical frequency
Fv (Hz)
Remarks
PC
50Hz
PC
60Hz
PC
48Hz
*1
*2
640 x 480
24.69
640 x 480
848 x 480
1024 x 768
48.36
848 x 480
24.62
40.365
39.988
31.47
31.02
1024 x 768
1280 x 768
47.78
1280 x 1024
63.98
1400 x 1050
65.32
38.69
38.51
1024 x 768
1280 x 768
1280 x 768
Input correspondence signals
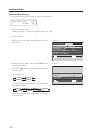
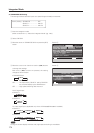
19) FRC Setting
This option allows switching of the frame rate conversion.
Factory setting: ON
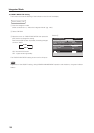
1 Enter the integrator mode.
(Refer to section 5.4.1, “About the Integrator Mode” (pg. 142).)
2 Select ‘OPTION’.
3 Place the cursor on ‘FRC’ then press the [SET] button.
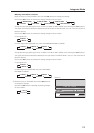
Each time the [SET] button is pressed, the setting changes
as shown below.
ON ........... Changes the frame rate.
OFF ......... Does not change the frame rate.
The ‘FRC’ setting is common for all inputs.
Screen 3