Saving Images (User level: ID2/3)
English 19
C Downloading Recorded Images to the Computer
Downloading DVR recorded images to the drive of a networked computer.
1
Playback the images you want to download
and click the channel selection button.
The full screen is displayed, you can start downloading.
2
Click to freeze the images at the point
where you want to start downloading.
3
Click in the operation panel.
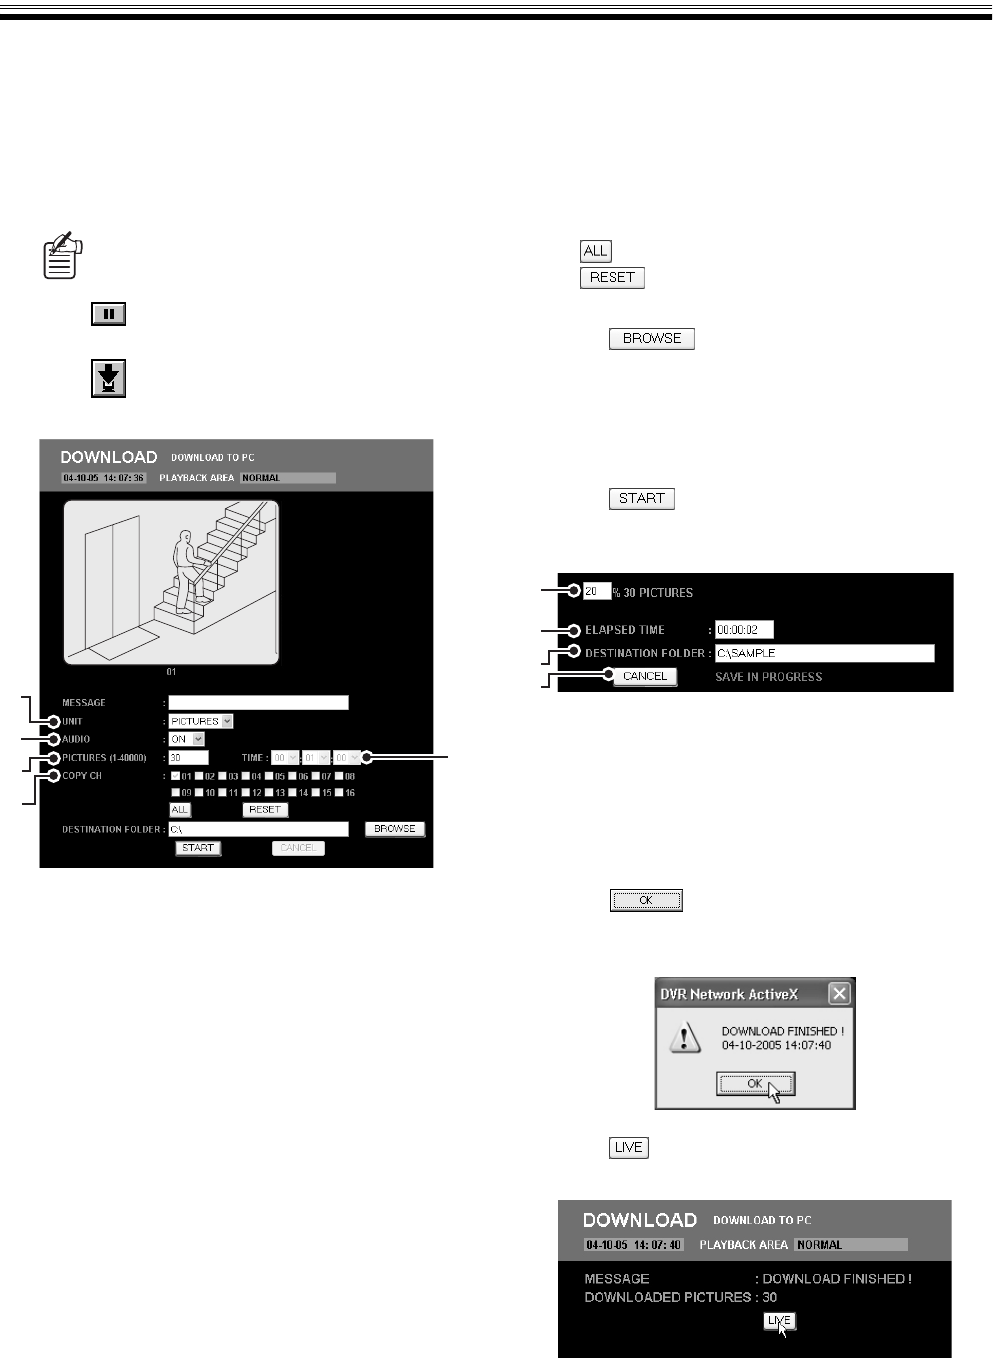
The DOWNLOAD screen is displayed.
4
Select the [UNIT] of the images you want to
download.
You can specify the images you want to download
using the number of images or the duration.
• PICTURES:
Number of images from the starting point (Total
number of images from the channel to be
downloaded)
• TIME:
Duration from the starting point (recording time)
5
Set [AUDIO].
To download audio data, as well as the image data,
select "ON".
6
Setting up the range of the images you want
to download.
Specify the value for the [UNIT] you chose in step 4.
• PICTURES: Between 1 and 40,000
• TIME: Hour(s): Minute(s): Second(s)
(00:00:01 - 99:59:59)
7
Check the box of the channel you want to
download from.
The channel currently displayed is automatically
checked. The check mark cannot be removed.
• :
Checks all the channels.
• : Uncheck the channels except for the
channel being currently displayed.
8
Click , select the destination folder
among the list of folders and click [OK].
The destination folder appears in [DESTINATION
FOLDER].
The destination folder may be directly entered in
[DESTINATION FOLDER].
9
Click .
Downloading starts and the operation status is
displayed.
1 Progress (0 - 100%)
2 Elapsed time
3 Destination folder
4 [CANCEL] button:
Clicking the button will interrupt download. The data
downloaded up to the moment when the download
was interrupted is saved on the computer.
10
Click once the "DOWNLOAD
FINISHED!" dialog appears.
The result of the download is displayed.
11
Click .
The operation returns to live video.
Use the search function to browse the recorded
images you want to play. (Refer to P14)
6
4
5
6
7
1
2
3
4
