


IP Office ContactStore 7.8 Page 68
15-601038 Issue 4b (06 July 2009)IP Office
Archival Procedures
The following section explain how to complete the basic archival procedures:
Loading a disk
To load a new disk:
1.Insert a blank DVD+RW disk in the drive.
2.Wait 10 seconds for it to spin up.
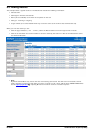
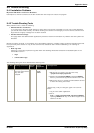
3.In the ContactStore System Administration application, click the System Overview link to confirm that the
ContactStore has recognized the disk.
The Current DVD media field shows that the disk has been recognized and is being written to; it also shows the volume
label that has been assigned to the new disk. The Free Space on current DVD media line shows 4.0GB available on a
clean disk.
Changing Disks
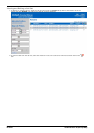
The System Overview page shows when the disk is full; however, you should change disks at regular intervals, for
example, daily, or every Monday at 9:00 am. Do not wait for a disk to fill up completely. If a DVD is filled, subsequent
calls cannot be archived until the next disk is inserted. You could lose recordings if there is a hard disk failure when the
DVD is filled.
· Tip
Check the state of the current disk in the drive daily, though alarms will be generated if the disk is not writable
when calls are ready to be archived.
To eject a disk that is still being recorded in order to retrieve calls from another disk, replace the partially full disk and
recording will continue to it.
· Important
The archival process never writes to disks out of sequence. For example, if you eject a partially full disk, then
insert a blank disk on which the next set of calls is written, you cannot then reinsert the partially full disk.
Labeling a Disk
As you eject each disk, label the disk itself using an approved indelible marker. Your label should indicate:
· The identifier of the ContactStore producing the disk. The identifier is Calls by default; you can change this value on
the Server Settings page of the System Administration application.
· The sequential serial number of the disk.
· The date/time the disk became full.
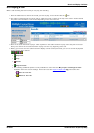
Verifying recorded disks
To verify that the contents of the disks are valid, you must first eject and re-insert the disk. Wait 10 seconds and then
open Explorer on the drive.
If the contents of the disk are valid, there will be a single UID file and a set of large.tar files that contain the .wav and .
xml files of the original recordings.
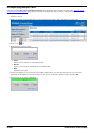
If you cannot resolve the problem, contact your supplier's support organization for advice. Be sure to:
· Place the disk back in its protective container.
· Store the disk in a logical order with the other recorded disks.