


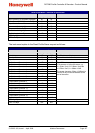


DCP200 Profile Controller & Recorder - Product Manual
51-52-25-150, Issue 1 – April 2009 Calibration Page 131
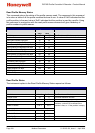
Recalibration Procedure
Recalibration is carried out in five phases as shown in the table below; each phase
corresponds to a basic input type.
CAUTION:
The 50mV phase MUST be calibrated before the thermocouple range.
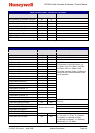
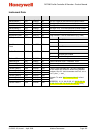
Table 27. Input Calibration phases
DC milli-volt Calibration
50 mV
DC voltage Calibration
10 V
DC milliamps Calibration
20 mA
RTD Calibration
200 ohm
Thermocouple Calibration
K type source at 0ºC
1. For optimum accuracy, power-up the instrument for 30 minutes, then toggle the power
off/on to restart the instrument.
2. During the power-up “splash screen”, press and together until the Calibration
Status screen is displayed.
3. Press to select the first calibration phase (50mV Calibration)
4. Ensure that an accurate 50mV signal has been applied to terminals 2 (+ve) and 3 (-ve),
then press + to initiate the calibration.
5. During calibration the message “50mV DC Input Calibrating” will display for a few
seconds. This should be followed by the “Calibration Successful” confirmation.
6. If the input is misconnected or an incorrect signal is applied, the calibration will be aborted
and the display will show “Failed: Signal Too Small!” or “Failed: Signal Too Large!”.
The previous calibration value will be retained.
7. Press to select the next calibration phase.
8. Repeat this process for each input type until all the phases are calibrated. For each phase,
ensure that the correct input is applied, using the correct connections.
9. Once all calibration phases are completed, recorder versions will display the Calibration
Reminder Date. If required, this can be changed to the date of your next calibration check.
Ensure that Calibration Reminders are enabled in Input Configuration to receive a
reminder.
10.Press + to exit to the main menu.
Note:
Calibration Mode automatically exits if there is no button activity for two minutes.