


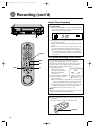

32
+
–
0
0
0
0
0
0
0
0
0
0
0
0
0
0
0
0
0
0
0
0
0
0
0
0
0
0
0
0
0
0
0
0
0
0
0
0
0
0
0
0
0
0
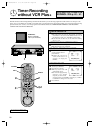
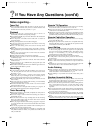
Editing
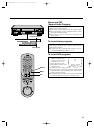
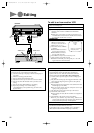
Your VCR can be used as either the recording deck or the source
player when editing tapes.
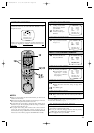
PREPARATION
1 Connect the player's VIDEO OUT and AUDIO OUT
connectors to the recorder's VIDEO IN and AUDIO IN
connectors.
Ⅲ When using your VCR as a recorder and connecting it to a
monaural deck, connect that deck's AUDIO OUT connector
to your VCR's AUDIO IN L connector.
OPERATION
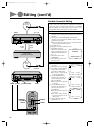
2 Press MENU, SET, and
SELECT as many times as
necessary to access the AUX
INPUT screen. (
੬ p. 7)
3 Press SET to choose "FRONT"
or "REAR".
Ⅲ Select FRONT to connect to
the front panel connectors.
Ⅲ Select REAR to connect to
the rear panel connectors.
4 Press MENU as many times as necessary to exit.
5 Set the recorder's input mode to AUX.
Ⅲ With this VCR model, press the digit key "0". "AU" will
appear instead of a channel number.
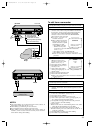
To edit to or from another VCR
Player
Your VCR
AUDIO OUT
VIDEO OUT
Recorder
Another VCR
AUDIO INVIDEO
IN
AUX INPUT
Ł FRONT
REAR
PRESS (SET +/–) FOR CHOICE
PRESS (MENU) TO END
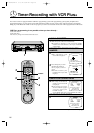
FOR ASSEMBLE EDITING
Assemble editing adds one recorded scene to another in
succession. To use your VCR as the recording deck...
6 Load the source tape in the player, and the recording tape in
your VCR.
7 Select the recording speed (SP or EP).
8 Put your VCR in the Record-Pause mode.
9 Play back the source tape to search for a scene to be edited.
0 Press the recorder's PLAY button where you want to start
editing.
! Press the recorder's PAUSE button to stop editing.
@ Repeat steps 9 through 11 to continue editing.
(Assemble Editing is also possible using your VCR as the
playback deck.)
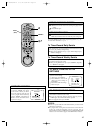
FOR INSERT EDITING
Insert editing replaces part of the recorded scene with new
material. Both the picture and Hi-Fi audio soundtrack are
replaced with new ones, while the normal audio soundtrack
remains unchanged.
Use your VCR as the recording deck.
6 Load the source tape in the player, and the recording tape in
your VCR.
7 Play back the recording tape and engage the Still mode at the
edit-in point (the beginning of the segment to be replaced).
8 Press INSERT.
Ⅲ Your VCR enters the Insert-Pause mode. (REC, PLAY and
PAUSE light up on the FDP.)
Ⅲ The TV screen changes from the still picture to the input
signal you are going to record.
9 Play back the segment of the source tape to be inserted.
0 Press PLAY on the recorder.
Ⅲ Insert editing will start. (PLAY and REC are displayed on
the FDP.)
! Press PAUSE on the recorder to stop insert editing.
Ⅲ Do not press STOP to stop insert editing, otherwise the
picture will be distorted at the switching point between the
newly inserted and previously recorded pictures.
FOR AV INSERT EDITING
If you want to replace the picture, Hi-Fi audio soundtrack and
normal audio soundtrack all at the same time...
In step 8 above, after you press INSERT, press A. DUB. also.
(REC and PLAY blink and PAUSE lights up on the FDP.)
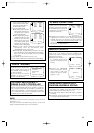
Rear AUDIO IN
VIDEO IN
or
HR-IP820U-EN-2 97.5.20 5:33 PM Page 32