


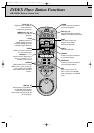

8
Your VCR can receive program title and CSPG data
from as many as 25 different stations. Select the
stations from which you want to receive this data.
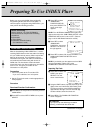
Preparation
1. Turn on the power to the TV and the VCR.
2. Set the TV to the channel or mode appropriate for
video playback.
3. Perform the Download Scanning procedure (see
page 6).
Procedure
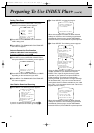
1 Press MENU twice. The Main Menu screen appears.
2 Press SET to select "SET-UP MENU", then press
SELECT.
3 Press SET to select
"DOWNLOAD
FUNCTION SETUP",
then press SELECT. The
screen to the right
appears:
4 Press SET to select "PREFERRED CHANNEL",
then press SELECT. The following screen appears:
NOTE: If you haven't yet
performed the Download
Scanning procedure, the
screen to the right appears:
Go to page 6 and perform the Host Station Download
Scanning procedure, then return to step 1 on this page
and begin the Preferred Channel Selection procedure.
5 Press SET to choose a channel from which you
want to receive CSPG data, then press SELECT.
"PREFER" appears on the right side of the screen.
Repeat the procedure for each desired channel
(the maximum being 25).
NOTES:
● If the station name is not displayed, you cannot
make that a preferred channel.
● If a non-preferred channel is sending its own CSPG,
you can obtain the data.
The HR-IP820U, using download data from the host
station, sets its own clock automatically. The set-up
procedure is described below.
Also explained in this section is the selection
procedure for end-of-program options.
Preparation
1. Turn on the power to the TV and the VCR.
2. Set the TV to the channel or mode appropriate for
video playback.
Procedure
Automatic Clock Set
1 Press MENU twice to select "MAIN MENU".
2 Press SET to select "SET-UP MENU", then press
SELECT.
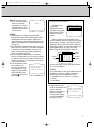
3 Press SET to select
"INDEX PLUS+ INITIAL
SET", then press
SELECT. The screen to
the right appears:
NOTE: In the INDEX Plus+ INITIAL SET screen, the
INDEX PLUS+ FUNCTIONS option does not appear
during recording.
4 Press SET to select
"AUTOMATIC CLOCK
SET", then press
SELECT. The screen to
the right appears:
5 Press SET to select either "ON" or "OFF".
Selecting ON allows automatic clock setting, while
choosing OFF disables the function.
NOTES:
● When AUTOMATIC CLOCK SET is enabled, the
clock's accuracy may vary slightly, depending on the
data received from the host station.
● The INDEX Plus+ memory backup allows the
memory to remain active for 24 hours without
power. In the event of a power failure, or if the
power cord is unplugged, as long as power is
restored to the VCR within 24 hours of the initial
outage, the clock is automatically set regardless of
the selection you made in step 5. If you don't
restore power to the VCR within 24 hours, the clock
returns to its initial setting ("AM 12:00" blinking).
6 Press MENU. The INDEX PLUS+ INITIAL SET
screen appears.
Preparing To Use INDEX Plus+ (cont'd)
INDEX Plus+ Initial Settings
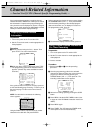
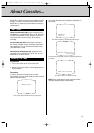
INDEX PLUS+ INITIAL SET
AUTOMATIC CLOCK SET
PROGRAM END SELECTION
INDEX PLUS+ FUNCTIONS
PRESS(SELECT,SET+/-)
PRESS(MENU) TO END
AUTOMATIC CLOCK SET
ON
OFF
PRESS(SET+/-) FOR CHOICE
PRESS(MENU) TO END
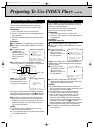
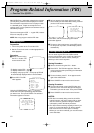
DOWNLOAD FUNCTION SETUP
DOWNLOAD FUNCTION
ZIP CODE
TIME ZONE
ANTENNA CONNECTION
PREFERRED CHANNEL
PRESS(SELECT,SET+/-)
(0):SCHEDULE (MENU):END
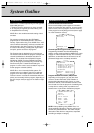
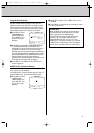
PREFERRED CHANNEL
2 CH 02 KABC:
5 CH 05 CBS :PREFER
9 CH 09 NBC :
13 CH 13 KCET:PREFER
23 CH 23 CNN :
(SET+/-)TO SELECT CH
(SELECT)TO ALTER SETTING
PRESS(MENU) TO END
AUTO CHANNEL MAPPING
ERROR
YOU MUST SET
CHANNEL MAPPING
MANUALLY
PRESS(MENU)TO END
Preferred Channel Selection
GUIDE CH
VCR CH
Station name
HR-IP820U INDEX Plus+ 97.5.20 5:45 PM Page 8