


56
Step
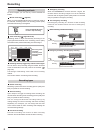
7 Set the pre-alarm recording time in [Pre-alarm
time] under [Alarm recording].
[0 Sec]: Pre-alarm recording is not performed.
•
Note that the actual pre-alarm recording time may
become shorter than the specifi ed time because of
HDD malfunction or other failure.
Notice
• Due to the restrictions on data format, the pre-alarm
recording time may vary from the specifi ed time.
• When the alarm recording area is allocated by the
partition setting, the alarm recording data and pre-
alarm recording data are saved in the alarm recording
area. To play back the already recorded data, set [Play
device selection] (
page 70) to [HDD (Alarm)].
• The picture quality and FPS of the normal recording or
alarm recording being executed are applied to the pre-
alarm recording.
• Pre-alarm recording is performed only when the pre-
alarm recording time is set to other than 0 second.
Recording (continued)
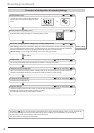
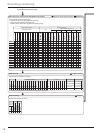
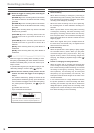
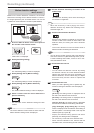
When [REC in normal recording mode by MD] is selected
Normal recording
Alarm recording
Normal recording
Alarm recording
EXT
MD-A
MD-B
EXT & MD-A
EXT & MD-B
EXT or MD-A
EXT or MD-B
(MD-A)
(MD-B)
(MD-A during the
terminal is grounding)
(MD-B during the
terminal is grounding)
(MD-A)
(MD-B)
(EXT)
(EXT)
(EXT)
Normal recording Alarm recording
(EXT)
(EXT)
(EXT)
(button)
(button or MD-A)
(button or MD-B)
(button or MD-A during
the terminal is grounding)
(button or MD-B during
the terminal is grounding)
(button or MD-A)
(button or MD-B)
(EXT)
(EXT)
(EXT)
Input setting
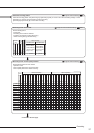
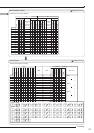
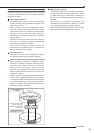
When [REC in alarm recording mode by MD] is selected
Normal recording
Alarm recording
Normal recording
Alarm recording
During manual operation
During timer operation During timer operation
EXT
MD-A
MD-B
EXT & MD-A
EXT & MD-B
EXT or MD-A
EXT or MD-B
Normal recording Alarm recording
(EXT)
(MD-A)
(MD-B)
(MD-A during the
terminal is grounding)
(MD-B during the
terminal is grounding)
(EXT or MD-A)
(EXT or MD-B)
(timer)
(timer)
(timer)
(timer)
(timer)
(timer)
(timer)
(timer)
(timer)
(timer)
(timer)
(timer)
(timer)
(timer)
(EXT)
(MD-A)
(MD-B)
(MD-A during the
terminal is grounding)
(MD-B during the
terminal is grounding)
(EXT or MD-A)
(EXT or MD-B)
(button)
(button)
(button)
(button)
(button)
(button)
(button)
(EXT)
(EXT)
(EXT)
Input setting
During manual operation
During timer operation During timer operation
(button): Recording starts when the REC/STOP button on the front panel of the recorder is pressed.
(EXT): Normal recording or alarm recording starts when a signal is input to the ALARM IN terminal on the rear panel of the recorder.
(MD): Normal recording or alarm recording starts when motion is detected.
(timer): Normal recording or alarm recording starts according to the timer recording settings.
: Neither normal recording or alarm recording is performed.
When [MD] on the Timer program
screen is set to [ON]
When [MD] on the Timer
program screen is set to [OFF]
When [MD] on the Timer program
screen is set to [ON]
When [MD] on the Timer
program screen is set to [OFF]
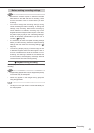
Step
8 Set the alarm recording time in [Post-alarm time]
under [Alarm recording].
[Manual]: Alarm recording continues until the
grounding of the ALARM IN terminal ceases.
•
When the setting is completed, select [Next]. The
<Picture quality and FPS> screen is displayed.
Notice
• Ensure that the Pre-alarm time is shorter than the
Post-alarm time.
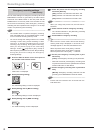
Picture quality and FPS
Step
9 Set the picture quality and FPS for normal
recording and alarm recording.
•
Recording is not performed when FPS is set to [---].
•
The picture quality has 9 levels from L1 to L9, and
L9 is the highest.
•
Images from cameras of which [Active] box is
selected are recorded. Images from cameras of
which [Active] box is unselected are not recorded.
•
By using [Ditto], you can copy the settings of the
above row.
•
When the setting is completed, select [Next]. The
<Alarm camera setting> screen is displayed.