


74
Searching from the alarm list
<Alarm list search>
At the start of alarm recording or emergency recording,
this recorder adds the recording start time to the alarm list.
You can search for the desired image from the start times
of alarm recording (or emergency recording) shown in the
alarm list.
Step
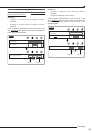
1 Set the search conditions.
•
According to "Setting the searching conditions" on
page 73, designate the device, camera, and time
to search.
The alarm list shows 10 alarm events occurring on or
before the date and time designated on the <Search
menu>.
Notice
• To perform alarm list search when the alarm recording
area and emergency recording area have been
created by the partition setting, designate the device
to search as [HDD (Alarm)] and [HDD (Emergency)]
respectively.
• When the device designated in step 1 doesn’t contain
images at the start point of alarm or emergency
recording, that recording cannot be searched by the
alarm list search.
Step
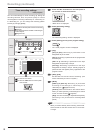
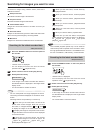
2 Select [Search] next to [Alarm list search].
Search
•
The alarm list shows 10 alarm events occurring on or
before the date and time designated on the <Search
menu>.
•
By clicking the button or the button, you can
search every 10 or 100 alarm events.
[New]: Latest 10 alarm events are displayed.
[Old]: Oldest 10 alarm events are displayed.
[Type]: For alarm events occurring when the
ALARM IN terminal on the rear panel is grounded,
EXT
is displayed. For those occurring when motion
is detected,
MD
is displayed. For those occurring
when the EMERGENCY terminal is grounded,
EMR
is displayed. For those occurring when an alarm
signal is input via the network,
LAN
is displayed.
Step
3 Click the date and time of the alarm event you
want to view.
•
The image of the selected alarm event is displayed
in the still image display mode.
•
By clicking the button or the button on the
search result screen, you can display the image of
the previous or next alarm event.
•
You can play back the retrieved image using the
buttons on the search result screen (
page 72) or
the buttons on the front panel of the recorder.
Searching for images you want to view (continued)
Searching images based on the
designated date and time
<Time date search>
You can search for images by designating their recording
date and time.
Step
1 Set the search conditions.
•
According to "Setting the searching conditions"
in the left column, designate the device, camera, and
time to search
Step
2 Select [Search].
Search
•
The image recorded on the designated date and
time is displayed in the still image display mode.
Step
3 To play back the image displayed as search
result, press the PLAY button or the PAUSE
button on the front panel of the recorder.
•
To stop playback, press the STOP button.
•
With a mouse, you can play back the image using
the buttons displayed on the search result screen.
(
Page 72)
Tips
• When there is no data recorded at the designated
time, the image from the same camera recorded at
the time closest to the designated time is displayed in
the still image playback mode. (The recorder searches
data 1 hour before and after the designated time.)
• When there are multiple data recorded at the same
time on the same date, repeat search several times
until the desired image is retrieved.
• Depending on the recording condition, the recorder
may not be able to search data correctly.