


The Initial Setup menu
15
139
En
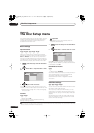
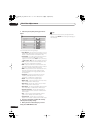
Analog Tuner
Auto Channel Setting Auto Scan
Select your country and then wait for the recorder to auto tune into channels
in your area. After auto scan has finished, the channel mapping screen
appears showing which channels have been assigned to which programme
numbers. You can skip unwanted channels using the Manual CH Setting
option below.
Press
HOME MENU
to exit the channel mapping screen.
Download from TV
If your TV supports this feature you can download all the channels that your
TV is tuned to via the SCART input. Select your country and then wait for the
download to complete. After the download is complete, the channel
mapping screen appears, as above.
See also the operating instructions that came with your TV for more
information.
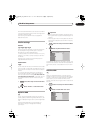
Manual CH Setting Next Screen
Proceed to the next screen if you need to adjust any of the settings made by
auto tuning. Select your country, then proceed to the manual channel
setting screen:
• Change channel presets using the
Smart Jog
.
• To skip the displayed channel (because there is no station assigned to that
channel), change the
Skip
setting to
On
.
• Set the
CH SYSTEM
setting to match the channel system of your country
or region.
• Set the
CHANNEL
setting to the channel you want to assign to the current
channel preset.
• To manually fine tune the channel, change the
AFT
setting to
Off
then
adjust the
Level
setting.
• Set the
Sound System
setting to match the sound system of your region.
• The
Name
field allows you to input a name of up to five characters for the
current channel preset.
• If the currently selected channel is scrambled requiring a decoder
connected to the
AV2 (INPUT 1/DECODER)
, set the
Decoder
setting to
On
.
Channel Swapping Next Screen
Proceed to the next screen to swap channel assignments of different presets
so that you can group together presets that naturally go together. Select two
presets to swap then press
ENTER
.
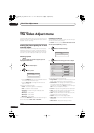
Video In/Out
Input Colour System Next Screen
Proceed to the next screen to set the input colour system for the external
input and the built-in TV tuner. Use the
Smart Jog
or
VIDEO IN
buttons to
change the preset or external input. On the default
Auto
setting the recorder
can generally correctly detect whether the input signal is PAL, SECAM, 3.58
NTSC or PAL-60, but in some cases you may have to set it manually if the
picture is displayed incorrectly.
• Input Colour System cannot be set when the recorder is in D.TV mode.
• See also About the input colour system on page 146 for more information on this setting.
Component Video
Out
Interlace •
Select if your monitor/TV is not compatible with progressive-scan video.
Progressive
Select if your monitor/TV is progressive-scan compatible. Check the
operating instructions that came with your monitor/TV if you’re not sure.
•
For Component Video Out to be effective, the AV1 Out setting (see page 140) must be set to something other than
RGB
.
•
If your TV is incompatible with progressive scan video and you select
Progressive
, you will not be able to see any picture at all. In this case,
press
OPEN/CLOSE
while holding down the
(Stop) button on the front panel to switch to
Interlace
(this also switches Screen Resolution on
page 144 to the default setting).
•
When the HDMI signal is output, no video is output from the
COMPONENT VIDEO OUT
.
Setting
Options Explanation
DVRLX60D_WV_EN.book 139ページ 2007年4月24日 火曜日 午後7時58分