


Connections
02
53
En
Important
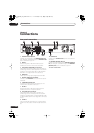
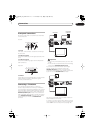
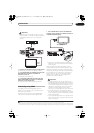
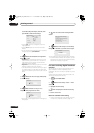
• Do not connect this recorder ‘through’ your VCR,
satellite receiver or cable box. Always connect each
component directly to your TV or AV amplifier/
receiver.
1 Connect your TV antenna to the recorder and TV.
See
Connecting a TV antenna
on page 49 for details.
2 Use a SCART cable (not supplied) to connect the
AV1 (RGB)-TV AV connector to a SCART AV
connector on your TV.
This enables you to watch discs.
3 Use another SCART cable to connect the AV2
(INPUT 1/DECODER) AV connector to a SCART AV
connector on your decoder box.
This enables you to record scrambled TV channels.
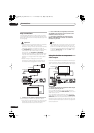
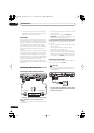
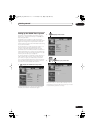
Connecting using HDMI
If you have an HDMI or DVI-equipped
1
monitor or
display
2
, you can connect it to this recorder using an
HDMI cable (not supplied).
The HDMI connector outputs uncompressed digital
video, as well as almost every kind of digital audio.
1 Use an HDMI cable to connect the HDMI OUT
connector on this recorder to an HDMI connector on
an HDMI-compatible display.
• The arrow on the cable connector body should be
face down for correct alignment with the connector
on the recorder.
When connected to an HDMI component or HDCP-
compatible DVI component, the HDMI indicator lights.
HDMI setup is generally automatic. There are however
settings you can change if you need to. See
HDMI Output
(only available when an HDMI device is connected)
on
page 144 for more information. Note that the HDMI
settings remain in effect until you change them, or
connect a new HDMI component.
Important
• An HDMI connection can only be made with DVI-
equipped components compatible with both DVI and
High-bandwidth Digital Content Protection (HDCP).
If you choose to connect to a DVI connector, you will
need a DVI to HDMI adaptor cable. A DVI to HDCP
connection, however, does not support audio.
Consult your local audio dealer for more information.
• The HDMI connection is compatible with 32 kHz,
44.1 kHz, 48 kHz, 96 kHz, 16 bit/20 bit/24 bit 2-channel
linear PCM signals, as well as Dolby Digital, DTS and
MPEG audio bitstream.
• If your connected component is only compatible with
Linear PCM, the signal is output as Linear PCM (DTS
audio is not output).
Note
1 Depending on the component you have connected, using a DVI connection may result in unreliable signal transfers.
2 The pixel resolution of this recorder’s HDMI video output is (according to TV format): NTSC (720 x 480i/p, 1280 x 720p, 1920 x 1080i/p) and PAL
(720 x 576i/p, 1280 x 720p, 1920 x 1080i/p). If your display is not compatible with these resolutions the picture may not be correctly reproduced.
AC IN
DIGITAL
AUDIO OUT
COAXIAL
HDMI OUT
CONTROL
G-LINK
IN
AV 1 (RGB) – TV
AV 2 (INPUT 1/DECODER)
S-VIDEO
VIDEOAUDIO
L
R
INPUT 3
COMPONENT VIDEO OUT
Y
P
B
P
R
ANTENNA
IN
OUT
ANTENNA(DIGITAL)
IN
OUT
5 V
30 mA
OUTPUT
TV
Decoder
2
3
From SCART AV
connector
To SCART AV
connector
AV2 (INPUT 1/
DECODER)
AV1 (RGB) - TV
AC IN
DIGITAL
AUDIO OUT
COAXIAL
HDMI OUT
CONTROL
G-LINK
IN
AV 1 (RGB) – TV
AV 2 (INPUT 1/DECODER)
S-VIDEO
VIDEOAUDIO
L
R
INPUT 3
COMPONENT VIDEO OUT
Y
P
B
P
R
ANTENNA
IN
OUT
ANTENNA(DIGITAL)
IN
OUT
5 V
30 mA
OUTPUT
HDMI
IN
HDMI-compatible display
HDMI
OUT
To HDMI
input
DVRLX60D_WV_EN.book 53 ページ 2007年4月24日 火曜日 午後7時58分