


Recording
06
88
En
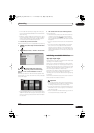
Recording from an external component
You can record from an external component, such as a
camcorder or VCR, connected to one of the recorder’s
external inputs.
1 Make sure that the component you want to
record from is connected properly to the HDD/DVD
recorder.
See Chapter 2 (
Connecting up
) for connection options.
2 Press repeatedly to select one of the
external inputs to record from.
The current input is shown on-screen and in the front
panel display:
•
AV2/L1
– Input 1
1
•
L2
– Input 2 (front panel)
•
L3
– Input 3
Check that the
Audio In
settings for
External Audio
and
Bilingual Recording
are as you want them (see
Audio In
on page 140).
• If the aspect ratio is distorted (squashed or stretched),
adjust on the source component or your TV before
recording.
• To watch video coming in via the DV input (front
panel), select
DV
>
DV Video Playback
from the
Home Menu (see also
Playing from a DV camcorder
on
page 101).
3 Set the recording quality.
• See
Setting the picture quality/recording time
on
page 83 for detailed information.
4 Select the HDD or DVD for recording.
5 Press to start recording.
• If your source is copy-protected using Copy Guard,
you will not be able to record it. See
Restrictions on
video recording
on page 80 for more details.
Playing your recordings on other DVD
players
Most regular DVD players can play finalized discs
recorded in DVD-R/-RW (Video mode) and DVD+R discs.
A number of players (including many Pioneer models)
can also play DVD-RW discs recorded in VR mode,
finalized or not. Most players will not play VR mode DVD
-R discs, although some DVD-ROM drives and DVD
recorders may be able to (finalization might be
necessary). Check the manual that came with the player
to check what kinds of discs it will play.
When you finalize a DVD-R/-RW (Video mode) or DVD+R
disc, a title menu is created from which you can select
titles when you play the disc. There are a number of
different styles of title menu to choose from to suit the
content of the disc.
All the title menus are navigated in the usual way,
pressing
MENU
or
TOP MENU
to display the menu, then
using the
///
followed by
ENTER
to select titles
and start playback.
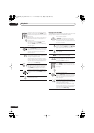
Finalizing a disc
Finalizing ‘fixes’ the recordings on the disc so that it can
be played on a regular DVD player or computer equipped
with a suitable DVD-ROM drive.
2
Note that the disc name will appear in the title menu after
you finalize a disc. Make sure the disc name is as you
want it before you finalize the disc as it can’t be changed
afterwards. If you want to rename the disc, see
Input Disc
Name
on page 132 before starting the steps below.
DVD+RW discs don’t generally need finalizing. However,
if you want a title menu to appear when you play the disc,
then you will need to finalize. When using a DVD+RW,
you can still record and edit even after finalizing.
although the title menu will disappear if you do so.
Finalize the disc again to generate a new title menu.
Important
• Once you’ve finalized a DVD-R/-RW (Video mode) or
DVD+R disc, you can’t edit or record anything else
on that disc. However, the finalization on a DVD-RW
disc maybe ‘undone’; see
Undo Finalize
on page 133
for how to do this.
Note
1 This cannot be selected if
AV2/L1 In
is set to
Decoder
(see
AV2/L1 In
on page 140).
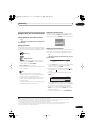
DVD (VR) DVD (Video) DVD+R DVD+RW DVD-RAM HDD
VIDEO IN
REC MODE
HDD/DV
D
REC
ì
2 If the TV line system of the disc is different to the current setting of the recorder, you will not be able to finalize the disc. See
Additional
information about the TV system settings
on page 146 for how to change the recorder’s setting.
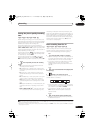
DVD (VR) DVD (Video) DVD+R DVD+RW
DVD (VR) DVD (Video) DVD+R DVD+RW
DVRLX60D_WV_EN.book 88 ページ 2007年4月24日 火曜日 午後7時58分