


Connections
02
54
En
• If you have connected to a Pioneer plasma display,
please select the HDMI setup on the display (refer to
the supplied manual for more on this).
About HDMI
HDMI (High-Definition Multimedia Interface) supports
both video and audio on a single digital connection for
use with DVD players and recorders, DTV, set-top boxes,
and other AV devices. HDMI was developed to provide
the technologies of High-bandwidth Digital Content
Protection (HDCP) as well as Digital Visual Interface
(DVI) in one specification. HDCP is used to protect digital
content transmitted and received by DVI-compliant
displays.
HDMI has the capability to support standard, enhanced,
or high-definition video plus standard to multi-channel
surround-sound audio. HDMI features include uncom-
pressed digital video, a bandwidth of up to five gigabits
per second (Dual Link), one connector (instead of several
cables and connectors), and communication between
the AV source and AV devices such as DTVs.
HDMI, the HDMI logo and High-Definition Multimedia
Interface are trademarks or registered trademarks of HDMI
licensing LLC.
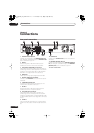
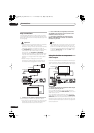
Connecting other AV sources
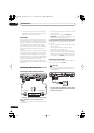
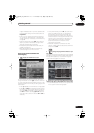
Connecting a VCR or analog camcorder
1 Connect a set of audio and video inputs of your
VCR or camcorder to a set of outputs on this
recorder.
This enables you to record from this recorder to your VCR
or camcorder.
• You can use standard video or S-video cables for the
video connection.
• Alternatively, you can use the
AV2 (INPUT 1/
DECODER)
SCART connector for audio/video input
and output with just one SCART cable.
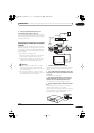
2 Connect a set of audio and video outputs of your
VCR or camcorder to a set of inputs on this recorder.
This enables you to record tapes from your VCR or
camcorder.
• You can use standard video or S-video cables for the
video connection.
• The front panel connections make convenient
connections for a camcorder input.
• When connecting an external AV source that only
supports monaural sound, only insert the left (white)
audio jack to this device. Doing so will allow the same
sound track to be recorded to both channels. You
must connect to the
INPUT 2
jack on the front panel.
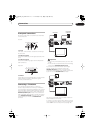
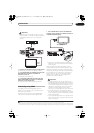
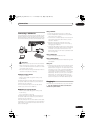
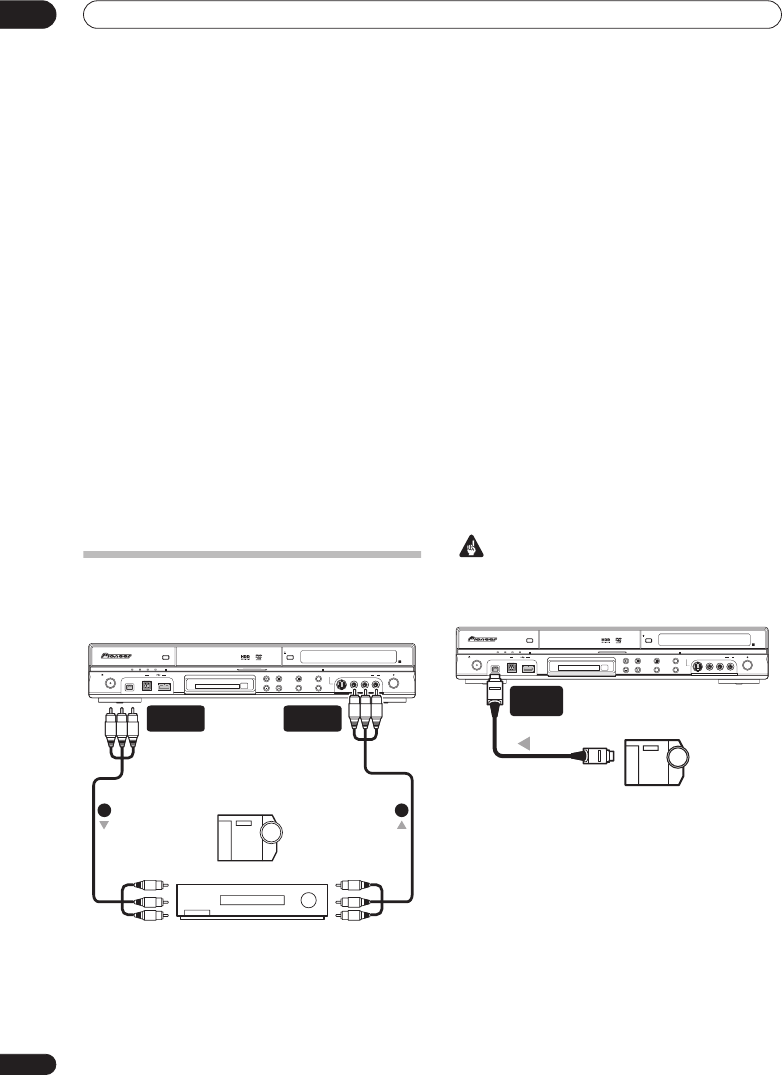
Connecting a DV camcorder
You can connect a DV camcorder or DVD recorder with
DV output to the front panel
DV IN
jack.
Important
• This jack is for connection to DV equipment only. It is
not compatible with digital satellite receivers or D-
VHS video decks.
•
Use a DV cable (not supplied) to connect the DV
jack of your DV camcorder to the front panel DV
IN jack of this recorder.
Analog camcorder
HDD/DVD
DivX
COPY HDMI
OPEN/CLOSE
STANDBY/ON
USB
DV IN
CH
INPUT
SELECT
STOP REC
ONE TOUCH
COPY
INPUT 2
VIDEO
S-VIDEO
L
(
MONO
)
R AUDIO
REC
A.TV/D.TV
COMMON INTERFACE
PLTVD.TVA.TV
VCR
(Rear panel)
AUDIO/VIDEO
OUTPUT
(Front panel)
AUDIO/VIDEO
INPUT
1 2
From audio/video outputTo audio/video input
DV camcorder
HDD/DVD
DivX
COPY HDMI
OPEN/CLOSE
STANDBY/ON
USB
DV IN
CH
INPUT
SELECT
STOP REC
ONE TOUCH
COPY
INPUT 2
VIDEO
S-VIDEO
L
(
MONO
)
R AUDIO
REC
A.TV/D.TV
COMMON INTERFACE
PLTVD.TVA.TV
DV
IN
From DV output
DVRLX60D_WV_EN.book 54 ページ 2007年4月24日 火曜日 午後7時58分