


94 ST-133 Controller Manual Version 3.B
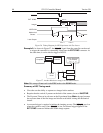
When the data is saved, both images are saved in a single *.spe file. The header is
followed by frame 1 and then immediately afterwards by frame 2. This system makes it
convenient to later load the images from the file for post processing analysis.
Notes:
1. For most of the MicroMAX DIF cameras, the ESABI timing mode is activated and
deactivated via the application software. If a MicroMAX DIF camera has a switch on
its back panel, this switch must be set to the ACTIVE position for operation in the
ESABI timing mode. At all other times it must be set to INACTIVE.
2. The Readout Mode set on the Controller/Camera Hardware Setup tab page must be
set to Full Frame for DIF operation. Do not select the Interline Readout mode,
even though, intuitively, Interline may seem to be the logical choice.
3. In the IEC, EEC or ESABI timing mode, set the Number of Images to 2 and
Accumulations to 1.
4. On the Setup Hardware Cleans/Skips tab page, click the Load Factory Values
button. This step is necessary for proper operation of the interline camera.
Timing Modes
The timing modes on the Timing tab page (Acquisition menu - Experiment Setup) when
using a DIF camera area as follows:
FREERUN (single shot),
IEC: Internal Exposure Control (two shot),
EEC: External Exposure Control (two shot), and
ESABI: Electronic Shutter Active Between Images (two shot).
Each of these modes is discussed in the following paragraphs.
Free Run
The Free Run mode allows the user to capture single images. The exposure time is set on
the Experiment Setup Main tab page, the same as in non-DIF systems, with the
difference that the exposure time can be as short as one 1 µs (maximum exposure time is
14.3 minutes). It often proves convenient to simply disable the mechanical shutter open
in Free Run operation. The shutter requires ~8 ms to open and 8 ms to close. The camera
waits until the shutter is completely open before acquiring the image, and in a typical
experiment, the second image acquisition will be over long before the shutter closes.
Readout doesn’t occur until the shutter closes.
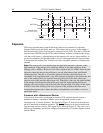
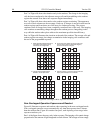
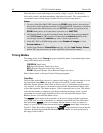
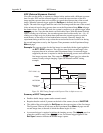
The
signal output of the controller can be used to trigger external equipment,
such as the laser. As soon as the shutter is completely opened and all of the cleans have
been performed,
goes low to indicate that the camera is ready to capture an
image. As soon as the first exposure actually begins,
returns high, as shown in
Figure 51. Thus, the positive going edge of the
output marks the start of the first
exposure. In Freerun operation, the time that
remains low will typically be in
the range of 400 to 600 ns.