


19
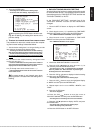
••••••••••••••••••••••••••••••••••••••••••••••••••••••••••••••••••••••••••••••••••••••••••••••••••••••••••••••••••••••••••••••• HDD SELF TEST
ENGLISH
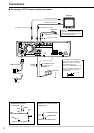
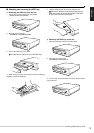
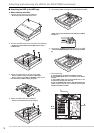
1. Attach the HDD to the unit, and connect the cameras, the
monitors, and the wired remote control (
see pages 12 to
17).
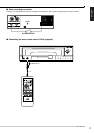
2. Turn on the MAIN switch on the rear panel and wait until
the ACCESS indicator is turned off.
3. Make sure that the POWER button on the front panel is
turned off. Press the WARNING RESET button for more than
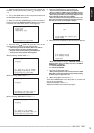
3 seconds until <HDD SELF TEST> screen appears.
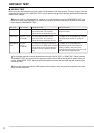
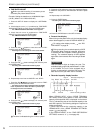
<HDD SELF TEST>
>>
QUICK TEST
READ TEST
READ/WRITE TEST
ENTER:EXECUTE,CLEAR:BACK
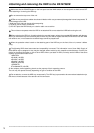
4. Press the JOG ,
buttons to move the cursor to the
desired setting and then press the ENTER button.
• There are 3 types of the test method. Refer to the table on
the previous page for choosing the desired method.
• The power turns off when pressing the CLEAR button.
• The test screen of the selected method appears.
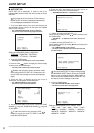
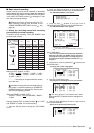
(When selecting “QUICK TEST”• • • )
<QUICK TEST>
>>
EXECUTE
ALL DATA WILL NOT BE ERASED
ESTIMATED TIME ABOUT 1 MIN.
ENTER:EXECUTE,CLEAR:BACK
(When selecting “READ TEST”• • • )
<READ TEST>
>>
EXECUTE
ESTIMATED TIME MORE THAN 1H
ENTER:EXECUTE,CLEAR:BACK
(When selecting “READ/WRITE TEST”• • • )
<READ/WRITE TEST>
>>
EXECUTE
ALL DATA WILL BE ERASED
ESTIMATED TIME MORE THAN 10H
ENTER:EXECUTE,CLEAR:BACK
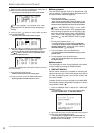
5. Press the ENTER button to execute the test.
• The test is executed and the status screen appears.
• When you attach the 2 HDDs, test for the HDD of drive A is
executed first, and then test for the HDD of drive B is executed.
• When testing the 2 HDDs, the percentage displayed on the
screen indicates the total value of the 2 HDDs.
• When the problem is found during testing the drive A, the
test of drive A finishes and the testing of the drive B starts. In
this case, the value of the percentage is skipped.
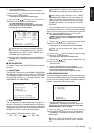
<HDD SELF TEST>
20%
DO NOT POWER OFF DURING TEST
CLEAR:CANCEL
6. When the test is completed, the test result screen appears.
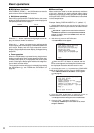
<HDD SELF TEST>
A:NO PROBLEM FOUND
B:NO PROBLEM FOUND
CLEAR:BACK
• When the problem is found, “PROBLEM FOUND” is
displayed. When there is no HDD in the drive, “NO DRIVE
CONNECTED” is displayed.
“A”: indicates MASTER HDD
“B”: indicates SLAVE HDD
7. Press the CLEAR button twice.
• When pressing the button once, the screen returns to <HDD
SELF TEST> screen which appears in step 3. When pressing
the button again, the power turns off.
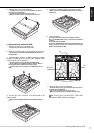
8. (When the problem is not found • • • )
Press the POWER button to turn the power on, and then set
the unit to start operating.
(When the problem is found • • • )
Replace the HDD and execute the test again.