21
••••••••••••••••••••••••••••••••••••••••••••••••••••••••••••••••••••••••••••••••••••••••••••••••••••••••••••••••••••••••••••••••• Initial settings
ENGLISH
9. Press the ENTER button.
• The background of the setting item turns red and flashes.
10. Press the JOG , buttons to display the desired setting
and then press the ENTER button.
• The setting item is determined and flashing stops.
11. Press the JOG , buttons to move the cursor to
“EXECUTE” and then press the ENTER button.
• The <RECORD SETTING> screen appears.
• This menu is used to set the recording interval and recording
picture quality of normal recording and alarm recording
corresponding to each camera numbers.
4
1
2
3
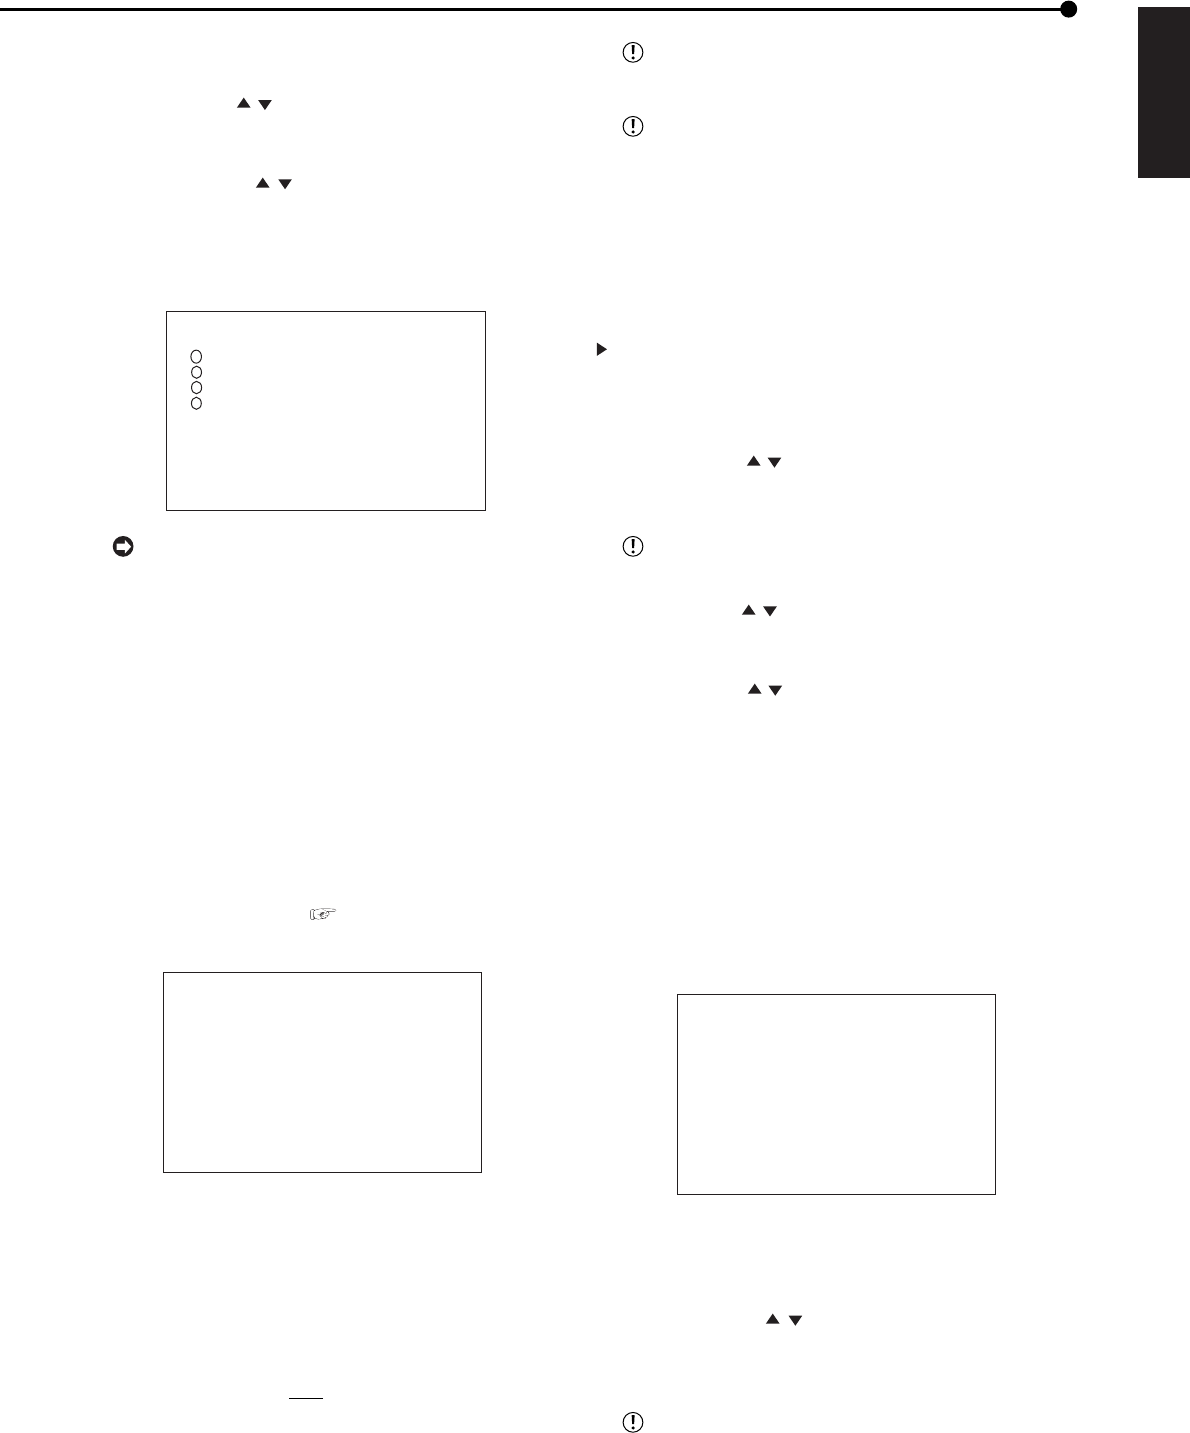
<RECORD SETTING>
NO PPS GRADE A-PPS A-GRADE
>>
12.5P SUPER 12.5P SUPER
------ SUPER ------ SUPER
------ SUPER ------ SUPER
12.5P SUPER 12.5P SUPER
ALARM TYPE ALARM CH
<ESTD REC> 1D11H55M
PRESS POWER BUTTON TO EXIT
Depending on the number of connected cameras
and the value of “RECORDING CYCLE,” the most
suitable setting of the “PPS,” “A-PPS,” “GRADE” and
“A-GRADE” are set automatically.
12. When the setting is completed, press the POWER button.
• “SETTING UP...” is displayed on the screen, and the unit
boots-up.
■ INITIALIZATION
This menu is used to set HDD SETTING and to initialize
the HDD.
♦ HDD SETTING
The HDD SETTING can be set to NORMAL, MIRRORING
(simultaneous recording of the 2 HDDs), or PARTITION
(an independent partition for alarm recording is set within
the total HDD memory). (
see pages 69 and 70 for
“MIRRORING” and “PARTITION”)
<INITIALIZATION>
>>
HDD SETTING NORMAL
BOOT UP DELAY 30S
POWER OFF
INITIALIZATION
ALL DATA WILL BE ERASED
WHEN PROCEED INITIALIZATION
♦ BOOT UP DELAY
The unit accesses the attached HDD when the power is
turned on. Depending on the HDD attached, it may take a
long time to be accessed. You do not have to change the
setting when this unit recognizes the attached HDD while
the BOOT UP DELAY is set to the default setting.
Setting of BOOT UP DELAY (default: “30S”)
“10S,” “11S,” • • • • • “
30S,” • • • • • “58S,” “59S”
Set “BOOT UP DELAY” with enough time to
accomodate the recognition time of attached HDD.
When setting timer recording in the <TIMER
PROGRAM SETTINGS> screen and setting the
“BOOT UP DELAY” with 30 seconds or more, the
recording start time delays for the amount of time
exceeds 30 seconds in the set-up time of “BOOT
UP DELAY.”
1. Turn on the MAIN switch on the rear panel and wait until
the ACCESS indicator turns off. Make sure that the POWER
button on the front panel is turned off. While pressing the JOG
button, press the POWER button on the front panel.
• The <INITIALIZATION> screen appears.
• POWER button operation is not accepted while the ACCESS
indicator is flashing. Press the POWER button after the
indicator turns off.
2. Press the JOG , buttons to move the cursor to “BOOT
UP DELAY” and then press the ENTER button.
• The background of the setting item turns red and flashes.
When you do not change the setting, select
“POWER OFF.”
3. Press the JOG , buttons to display the desired setting
and then press the ENTER button.
• The setting item is determined and flashing stops.
4. Press the JOG , buttons to select “POWER OFF” and
then press the ENTER button.
• The unit turns off.
5. Press the POWER button on the front panel.
• When the amount of time set for BOOT UP DELAY is passed,
the unit starts accessing the attached HDD.
• Confirm that the attached HDD is recognized correctly.
♦ HDD RECONSTRUCTION
This unit automatically detects the HDD connected to the
unit when the POWER button on the front panel is pressed
to turn on the unit. When the HDD is connected, added, or
deleted, excecute the HDD reconstruction.
<HDD RECONSTRUCTION>
A: HDD(120GB)
B: HDD(120GB)
>>
POWER OFF
RECONSTRUCTION
1. Press the POWER button on the front panel.
• “SETTING UP...” is displayed on the screen, and the unit
boots-up. When the unit detects the change of the HDD, <HDD
RECONSTRUCTION> screen is displayed.
2. Press the JOG , buttons to move the cursor to
“RECONSTRUCTION” and then press the ENTER button.
• “SETTING UP...” is displayed on the screen, and the unit
boots-up again.
To exit <HDD RECONSTRUCTION> screen
without reconstructing the HDD, select “POWER
OFF.”


