


48
••••••••••••••••••••••••••••••••••••••••••••••••••••••••••••••••••••••••••••••••••••••••••••••••••••••••••••••••••••••••••••••••••••••••••••••••••••••••••
<INITIAL SET UP/INFORMATION> (continued)
When executing complex playback operations
with the PLAY or REV.P button during alteration
check, the “IMAGE MODIFIED” warning may appear.
Execute alteration check during normal playback.
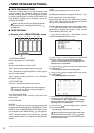
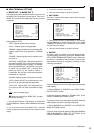
IMAGE MODIFIED( )
1
2
3
♦ SEQUENTIAL PLAY
This item is used to make backups of the video recorded
with this unit to an analog video recorder etc. while playing
back the video of each camera in the single screen display.
The playback order and time of each camera will be the
order of the recorded video.
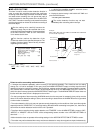
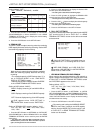
<HDD SETTINGS>
HDD REPEAT REC MAIN ON
HDD REPEAT REC SUB OFF
HDD REPEAT PLAY OFF
IM-CHECK PLAY OFF
>>
SEQUENTIAL PLAY OFF
Setting (default: “OFF”)
“ON”: Executes the sequential playback in the single
screen display.
“
OFF”: Does not execute the sequential playback in
the single screen display.
Sequential playback is executed at a playback
interval of 25P.
1. Press the SET UP button
}
<SETTINGS>
}
<INITIAL SET
UP/INFORMATION>
}
Select “SEQUENTIAL PLAY” in the
<HDD SETTINGS> screen. Display the desired setting and
determine such setting.
2. Press the CLEAR button or the SET UP button.
3. Press the PLAY button.
4. Press the SPLIT/SINGLE button to display the single
screen display and then press the +, – button to display the
recorded video.
• Sequential playback in the single screen display starts.
When performing sequential playback for video
with long recording intervals, the video of the highest
camera number selected for recording is played back
for the longest time.
■ AUDIO RECORDING
This item is used to simultaneously record audio along with
the video. When recording audio, the continuous recording
time becomes shorter than when recording only video.
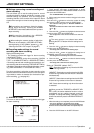
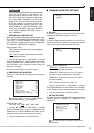
<INITIAL SET UP/INFORMATION>
HDD SETTINGS
>>
AUDIO RECORDING OFF
REAR TERMINAL SETTINGS
COMMUNICATION PORT SETTINGS
INFORMATION/SERVICE
PASSWORD
LANGUAGE SELECTION
Setting (default: “OFF”)
“ON”: Records video and audio.
“ALARM”: Records video and audio during alarm
recording and emergency recording.
“
OFF”: Does not record audio.
1. Press the SET UP button
}
<SETTINGS>
}
Select “AUDIO
RECORDING” in the <INITIAL SET UP/INFORMATION>
screen. Display the desired setting and determine such setting.
2. Press the CLEAR button or the SET UP button.
When setting “AUDIO RECORDING” to “ON,” a
speaker display (
) appears next to <ESTD REC>
in the <RECORD SETTING> and <REC MODE A>
to <REC MODE D> screens.
Even when setting “AUDIO RECORDING” to
“ON,” audio cannot be recorded under the following
settings.
• Audio recording cannot be performed when “PPS”
of “RECORD SETTING” for normal recording are
all set to the value smaller than “0.333P.”
In this case, (
X) appears to the right of <ESTD
REC>.
• When the “ALARM TYPE” during alarm recording
is set as follows:
“ALARM CH”: “A-PPS” of all the cameras set for
alarm recording are set to the value smaller than
“0.333P.”
“ALARM PLUS”: “PPS” and “A-PPS” of all the
cameras set for normal recording and alarm
recording are set to the value smaller than “0.333P.”
The recorded audio may be interrupted while
playback depending on the recording settings.