


6
••••••••••••••••••••••••••••••••••••••••••••••••••••••••••••••••••••••••••••••••••••••••••••••••••••••••••••••••••••••••••••••••••••••••••••••••••••••••••
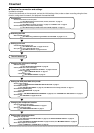
Flowchart
■ Flowchart for connection and settings
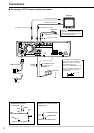
Installation example:
Connect the terminals on the rear panel; and set the initial settings. Next, make an alarm recording using the timer
function, using alarm list search, and playback the searched data.
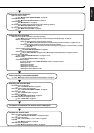
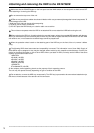
Connections
• Connect the terminals on the rear panel.
See “■ Connecting to CCTV camera, monitor, and sensor” on page 12.
• Connection for the alarm recording.
See “■ Alarm recording connection” on page 13, and “■ Rear view” on page 9.
• Connect the supplied wired remote control (R-400).
See “■ Connecting the wired remote control R-400 (supplied)” on page 13.
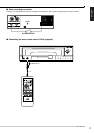
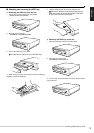
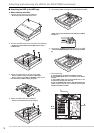
Attaching the HDD
• Attach the HDD to this unit.
See “■ Attaching and Removing the HDD to the DX-NT400E” on pages 14 to 17.
Setting up the unit
• Test the HDD attached to the unit.
See “■ HDD SELF TEST” on pages 18 and 19.
• Set up the unit using <AUTO SET UP> menu.
See “■ AUTO SET UP” on pages 20 and 21.
The unit boots-up.
Changing the initial menu settings
• Select the language.
See “■ LANGUAGE SELECTION” on page 28.
• Set the present time and screen display.
See “<TIME DATE/DISPLAY SETTINGS>” on pages 34 and 35.
• Set the present time.
See “♦ TIME DATE ADJUST” on page 24.
• Set the display mode.
See “■ DISPLAY MODE” on page 34.
Setting the HDD (hard disk drive) mode
• Set the repeat recording.
See “♦ HDD REPEAT REC MAIN/HDD REPEAT REC SUB” on page 47.
• Set the audio recording.
See “■ AUDIO RECORDING” on page 48, and “■ Continuous recording time table” on page 77.
• Set the remaining HDD capacity.
See “■ REMAIN HDD” on page 50.
• Set the CALL OUT.
See “• HDD MAIN REMAIN/HDD SUB REMAIN” on page 50, and “• HDD MAIN FULL/HDD SUB FULL” on page 51.
• Set the buzzer.
See “■ BUZZER” on pages 49 and 50.
Changing the multiplexer function
• Change the SPLIT4 screen setting.
See “■ SPLIT4 SCREEN SETTING” on page 37.
• Change the sequence setting.
See “■ SEQUENCE SETTING” on page 37.
Setting other various functions
• Change the display mode.
See “■ CLOCK LOCATION SETTING” on page 34, and “■ DUPLEX MODE DISPLAY” on page 35.
• Set the camera title/memo.
See “■ CAMERA TITLE/MEMO SETTING”on pages 34 and 35, and “■ CAMERA DISPLAY” on page 34.
• Set to output signals of the unit status.
See “♦ MODE OUT 1 to MODE OUT 5” on page 49.