24
Progressive
When you connect a progressive format
TV to this recorder using the
COMPONENT VIDEO OUT jacks,
select “Compatible.”
HDD caution messages
Read the HDD caution messages, and
press ENTER.
4 Select “Finish Setup” using M/m, and
press ENTER.
“Easy Setup” is completed.
To return to the previous step
Press O RETURN.
z Hint
If you want to run “Easy Setup” again, select “Easy
Setup” in the “Basic” setup from “Initial Setup” in
the System Menu (page 110).
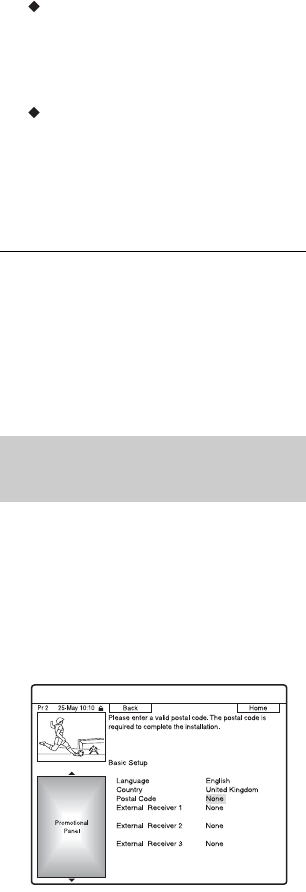
Follow the steps below to set up the GUIDE
Plus+ system and set top box controller. The
GUIDE Plus+ system is available in the UK
only.
1 Press GUIDE.
The GUIDE Plus+ system “Basic Setup”
appears.
For users other than in the UK, go to
step 4.
2 Select “Postal Code,” and press
ENTER.
3 Enter your postal code using </M/m/
,, and press ENTER.
If “Country” is set to “Others,” you
cannot enter a postal code and the
GUIDE Plus+ system will not search for
a host channel.
4 Select “External Receiver 1,” and
press ENTER.
You can also select “External Receiver
2” or “External Receiver 3” if you have
connected additional set top box
receivers.
5 Press ENTER to select “Continue.”
6 Select the set top box receiver type
using M/m, and press ENTER.
7 Select the provider using M/m, and
press ENTER.
8 Select the receiver brand using M/m,
and press ENTER.
If you select “Other providers,” you can
select a receiver brand from a list of all
available brands.
If your receiver brand is not on the list,
select “???.”
The receiver brand list is automatically
updated, so your receiver may be
available at a later date. Select your brand
when it becomes available. Until then,
use “???.”
9 Select the connection you used for
your set top box receiver using M/m,
and press ENTER.
When the set top box receiver is
connected to the recorder using hookup
A with both an aerial cable and a SCART
cord, select either “Line1” or “Antenna.”
The display asks for confirmation.
10
Press ENTER to select “Continue.”
The Video Window switches to the
specified programme position.
Setting up the GUIDE Plus+
®
system/set top box controller


