


16
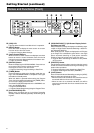
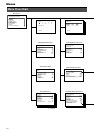
SEARCH
MENU
REV
SKIP
FWD
HDD
OPERATE
LOCK
VIDEO AUDIO
OUT
EXECUTE
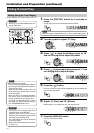
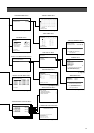
1.
3.4.2.3.
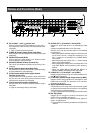
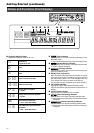
MENU
CLOCK SET
ONSCREEN MODE
FDP/BUZZER
REC MODE
CAMERA TITLE
OPERATION/EXT REC
MONITOR DISPLAY
ALARM SENSOR MODE
PROGRAM TIMER
NETWORK
DISK UTILITY/MAINTENANCE
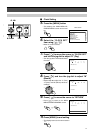
MAIN MENU/OPERATION MENU
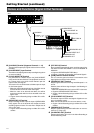
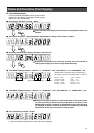
RESTART, AFTER TIME ZONE SETTING.
START?
UTC
TIME ZONE SETTING
[CANCEL]:CANCEL [EXEC]:START
[EXEC]:REGISTER
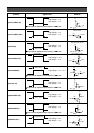
CLOCK SET
DM
Y
HM
15 07 2003 12 28
**************
**************
**************
**************
<= : RETURN
US/Michigan
US/Mountain
US/Pacific
US/Samoa
UTC
TIME ZONE
Menu Screen
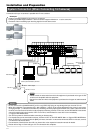
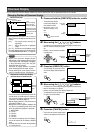
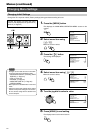
Installation and Preparation (continued)
Setting the Date/Time
Onscreen Setting Using the Monitor Screen
Set the date and time on the monitor screen.
•Pay attention when changing dates if the
hard disk contains recorded data.
Playback, Skip Jump or Direct Jump by
Date/Time may not properly function if there
is overlap in the recording dates.
• Date/Time setting is disabled when in the
Recording mode.
• Refer to the notes related to Summer Time.
(☞ Page 116)
Caution
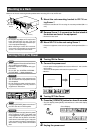
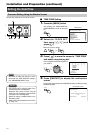
1.
Press the [MENU] button
• This displays the “MAIN MENU/OP-
ERATION MENU” screen on the moni-
tor.
2.
Select the “CLOCK SET”
item using [ / ] and
press [ ]
•Move the cursor to select.
3.
Press [ ] to move the cursor to “TIME ZONE”
and select using the jog dial
•Turn the jog dial to select the region that
you reside in.
4.
Press [EXECUTE] to display the confirmation
screen
• It will restart automatically and “TIME ZONE” will be set when pressing
[EXECUTE] again.
• The order of D/M/Y will change in accor-
dance with the “DATE DISPLAY” setting in
the “ONSCREEN MODE” menu.
Note
Ⅵ TIME ZONE Setting
Confirmation screen
REV FWD
EXECUTE