


18
STILL
DISPLAY
CANCEL
SEARCH
MENU
REV
SKIP
FWD
HDD
OPERA
T
LOCK
VIDEO A
U
OUT
EXECUTE
TIMER
2.3.4.6.1.7. 3.4.5.6.
DISPLAY
REV FWD
REV FWD
REV FWD
DISPLAY
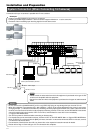
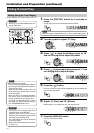
Installation and Preparation (continued)
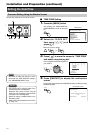
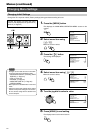
Setting the Date/Time
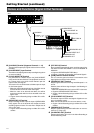
Setting Using the Front Display
Set the date/time on the front display of VR-716.
1.
Press the [DISPLAY] button for 2 seconds or
longer
• The “D” (Day) item on the front display will start to blink.
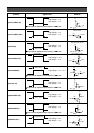
2.
Turn the jog dial to adjust “D” (Day)
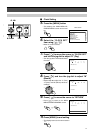
3.
Press [ ] to move the blinking cursor to “M”
and turn the jog dial to adjust the month
4.
Press [ ] to move the blinking cursor to “Y” and
turn the jog dial to adjust the year
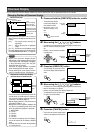
5.
Press the [ ] button
• The hour and minute values will be displayed on the front display but
only the hour value blinks.
6.
Adjust “H” (Hour) and “M” (Minute)
• Repeat Steps
3
~
4
to adjust the hour and minute values.
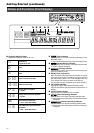
7.
Press the [DISPLAY] button
• This sets and starts the clock.
•Pay attention when changing dates if the
hard disk contains recorded data.
Playback, Skip Jump or Direct Jump by
Date/Time may not properly function if there
is overlap in the recording dates.
• The “TIME ZONE” item cannot be altered
on the front display.
• Refer to the notes related to Summer Time.
(☞ Page 116)
Caution
• Date/Time setting is disabled when VR-716 is in the Recording mode.
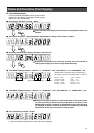
When adjusting the
seconds
:
• Press and hold the [LOCK] button followed
by pressing the [STOP] button to adjust the
seconds
of the clock.
• When the value is 29 seconds or less, this
will be reset to 00 seconds with the minute
value unchanged.
• When the value is 30 seconds and above,
this will be reset to 00 seconds with the
minute rounded to the next higher value.
• The order of D/M/Y will change in accor-
dance with the “DATE DISPLAY” setting in
the “ONSCREEN MODE” menu.
Note
Notes
• Ensure to set the TIME ZONE before set-
ting the Date/ Time.
Caution