


8
ALARM
SENSOR
SEQUENCE
MULTI
REC STOP PLAY STILL
DISPLAY
CANCEL
SEARCH
MENU
REV
SKIP
FWD
HDD
OPERATE
LOCK
VIDEO AUDIO
OUT
EXECUTE
ALARM
SENSOR
ALARM
SENSOR
ALARM
SENSOR
11 1
910
34
12
78
56
13 14
15 16
TIMER
!#
^
%
$
& * (
@
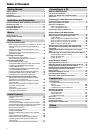
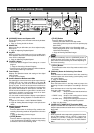
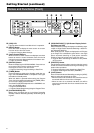
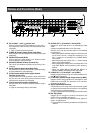
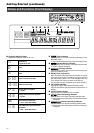
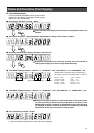
Names and Functions (Front)
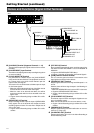
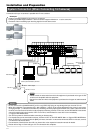
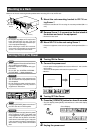
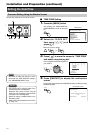
Getting Started (continued)
! [HDD] LED
Lights up when the built-in hard disk drive is in operation.
@ [MENU] Button
Press this button to display the menu screen or to return
from the menu to the main screen.
☞ Page 22 ‘Changing Menu Settings’
# Cursor Control Buttons
When the menu or search screens are displayed, use these
buttons to move the cursor. Otherwise, these are used to
change the onscreen display positions of the date or title.
☞ Page 19 ‘Onscreen Display’
$ [SEARCH] Button
Button for displaying the “SEARCH MENU”. Press this but-
ton to perform alarm search or date/time search.
Press again to return to the main screen.
☞ Page 40 ‘Searching Image According to Date/Time’
% [TIMER] Button
Press this button to switch to the Standby mode after set-
ting in the “PROGRAM TIMER” is completed. Press again
to disable the Standby mode.
When this button is pressed before setting the Program
Timer, the buzzer will be activated and the [TIMER] indica-
tor on the front display will start to blink.
The ON/OFF of BUZZER depends on the “WARNING” set-
ting in the “BUZZER” Menu.
☞ Page 24 ‘BUZZER Menu’
☞ Page 46 ‘Record Programming Using the Program Timer’
^ [ALARM SENSOR] LED
Blocks (every 4 entries) that are in the Alarm Recording
Standby or Sensor Recording Standby modes will light up
in green.
& [SEQUENCE MULTI] / Split Screen Display Switch-
ing Button and LED
Press this button to change the display in the following ways:
16 Split z Single Picture Automatic Switching z Quad Pic-
ture Automatic Switching
When quad picture or 16 split are displayed, the LED lights
up in orange. This is indicated in green when in the single
picture automatic switching or quad picture automatic
switching. Does not function when in the Play mode.
☞ Page 33 ‘When Connecting the Monitor to the [VIDEO
OUT] terminal’
* [EXECUTE] Button
Use this button to perform alarm search or date/time search
as well as to execute hard disk scanning or formatting or to
perform other operations.
☞ Page 40 ‘Searching Image According to Date/Time’
☞ Page 58 ‘Initializing the Hard Disk (“FORMAT”)’
( [LOCK] Button
Press and hold this button followed by pressing the [STOP]
button to adjust the seconds of the clock.
• When the value is 29 seconds or less, this will be reset to
00 seconds with the minute value unchanged.
• When the value is 30 seconds and above, this will be
reset to 00 seconds with the minute rounded to the next
higher value.