


61
COM
EXT REC
OUT
REC
SER
IN
OUT
RST
CLK
OUT
WAR
INCOMRST
OUT
161412108642
15131197531
ALARM
COM
EXT REC
OUT
REC
SER
IN
OUT
RST
CLK
OUT
WAR
INCOMRST
OUT
161412108642
15131197531
ALARM
•••••
<VR-716 2>
<VR-716 1>
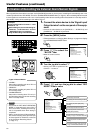
[CLOCK RESET OUT] [SERIES REC OUT]
[COM]
[COM]
[SERIES REC IN][CLOCK RESET IN]
COM
EXT REC
OUT
REC
SER
IN
OUT
RST
CLK
OUT
WAR
INCOMRST
OUT
161412108642
15131197531
ALARM
1316912
5
814/16
EE OUT
SCSI
RS-232C UPS
21
AUDIO OUT VIDEO OUT
21
LAN
AUDIO IN
VIDEO IN
THRU OUT
12345678910111213141516
CAUTION
RISK OF ELECTRIC SHOCK
DO NOT OPEN
AVIS:RISQUE DE CHOC
ELECTRIQ
COM
EXT REC
OUT
REC
SER
IN
OUT
RST
CLK
OUT
WAR
INCOMRST
OUT
161412108642
15131197531
ALARM
1316912
5
814/16
EE OUT
SCSI
RS-232C UPS
21
AUDIO OUT VIDEO OUT
21
LAN
AUDIO IN
VIDEO IN
THRU OUT
12345678910111213141516
CAUTION
RISK OF ELECTRIC SHOCK
DO NOT OPEN
AVIS:RISQUE DE CHOC
ELECTRIQ
AC IN
SIGNAL GND
(220V–240V )
AC IN
SIGNAL GND
(220V–240V )
COM
EXT REC
OUT
REC
SER
IN
OUT
RST
CLK
OUT
WAR
INCOMRST
OUT
161412108642
15131197531
ALARM
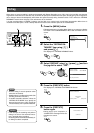
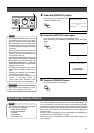
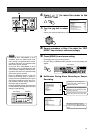
[EXT REC IN]
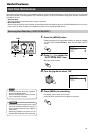
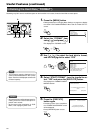
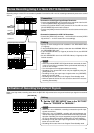
Series Recording Using 2 or More VR-716 Recorders
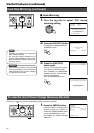
1.
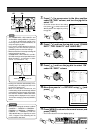
Set the “EXT REC MODE” item in the “EXT REC”
Menu to “TRIGGER” or “MANUAL”.
Activation of Recording Via External Signals
While in the Stop mode, recording starts when the [EXT REC IN] terminal at the rear panel receives input signals from external
devices.
Connection
Recording using 2 or more VR-716 recorders is possible. Once the first VR-716 is full, recording automatically starts at the second
VR-716.
<Connection of the Signal Input/Output Terminals>
• Connect the [SERIES REC OUT] terminal at the rear panel of the first VR-
716 to the [SERIES REC IN] terminal of the second.
•Connect the [CLOCK RESET OUT] terminal of the first VR-716 to the
[CLOCK RESET IN] terminal of the second.
• Connect the [COM] terminal of the first VR-716 to the same terminal at the
second.
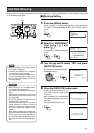
<Connection between the 2 VR-716 Recorders>
•Connect the [THRU OUT] terminals 1 - 16 of the first VR-716 to the [VIDEO
IN] terminals 1 - 16 of the second VR-716 accordingly.
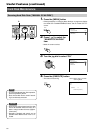
Setting
• Specify the same settings for both recorders in the “REC MODE” Menu
(☞ Page 24).
• In the “OPERATION” Menu, specify a value other than “NORMAL REC” for
the “RECOVERY REC” item.
• In the “OPERATION” Menu (☞ Page 25) of the first VR-716, set “REPEAT
REC” to “OFF”.
• Set the “SERIES REC” item in the “EXT REC” Menu (☞ Page 25) to “ON”
for both recorders.
• When the [CLOCK RESET OUT/IN] terminals are connected, the clock
in the 2 or more VR-716 recorders will be synchronized twice a day at
12:00 am and 12:00pm.
•Turn off the power of the equipment before connecting.
• Recording at the second VR-716 can only be stopped by using the
[STOP] button on it.
• Recording will not start upon input of signals when the [OPERATE]
button is in the OFF mode.
• Recording will not start when in the Program Timer Standby mode.
• When the power of the first VR-716 is cut off, the second VR-716 starts
recording automatically.
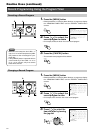
Notes
• When this is set to “MANUAL”, recording is executed only while input
signals are received.
• When this is set to “TRIGGER”, recording will continue between the
interval when input signals are received until after execution of the Stop
operation. Recording can only be stopped by using the [STOP] button
on VR-716. Recording cannot be stopped using an external device.
• Recording will not start upon input of signals when the [OPERATE]
button is in the OFF mode.
• Recording will not start when in the Program Timer Standby mode.
Notes
Setting
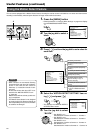
Camera 1
Camera 16
<Signal Input/Output Terminals>