


19
EXECUTE
DATE/TIME
TITLE
DATE/TIME
TITLE
EXECUTE
TITLE
DATE/TIME
CANCEL
60%
SLOW
AL
01-03-2003 SA 12:34:56
AL
*
3
TITLE
DATE/TIME
60%
AL
*
3
AL
01-03-2003 SA 12:34:56
SLOW
1
2
4
3
5
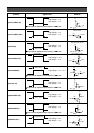
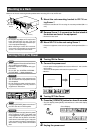
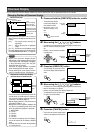
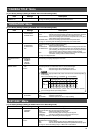
Onscreen Display
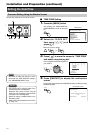
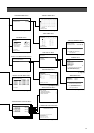
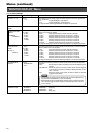
Changing Position of Onscreen Display
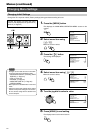
• When in the Onscreen Display Position
Adjustment mode, background of the ‘Date/
Time Display’ and ‘Title Display’ will appear
in blue alternately every time the [EX-
ECUTE] button is pressed.
Alteration of display position is possible
when the background is shown in blue.
•Priority will be given to the ‘Date Time Dis-
play’ if it overlaps with the ‘Title Display’.
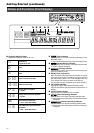
<Onscreen Display>
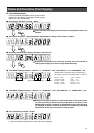
• Alarm (Sensor) No. display includes the fol-
lowing:
[AL] : The largest alarm (sensor) no.
registered
[AL *] : Alarm (Sensor) No. of playback
image
[AL * P] : Presensor No. of playback image
•
Onscreen display settings can be specified on
the “ONSCREEN MODE” Menu. (☞ Page 23)
VR-716 allows the onscreen display of Date/Time, Alarm (Sensor) No. and the operational state on the monitor.
Notes
Remaining Hard Disk Space (Blinks when reached 0%)
‘Date/Time
Display’
‘Title
Display’
Day-Month-Year
Day of the Week
Time
(24-hour Display)
Alarm (Sensor) No.
Camera Title
Alarm (Sensor)
Detection (Blinks)
Playback Direction
(Operational State)
‘Warning
Display
Area’
‘Title
Display’
1.
Press and hold the [EXECUTE] button for a while
• The monitor screen switches
to the Onscreen Display Po-
sition Adjustment mode.
• Background color of the
‘Date/Time Display’ turns
blue.
2.
Move using the [ / / / ] buttons
• The position can be moved diagonally by pressing buttons simultaneously.
•Move the ‘Date/Time Display’ to any posi-
tion.
•However, it cannot be shifted to the ‘Warn-
ing Display Area’.
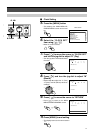
3.
Press the [EXECUTE] button
• The ‘Title Display’ turns blue and is now in
the Onscreen Display Position Adjustment
mode.
4.
Move using the [ / / / ] buttons
• The position can be moved diagonally by pressing buttons simultaneously.
•Move the ‘Title Display’ to any position.
•However, it cannot be shifted to the ‘Warning Display Area’.
• The displayed characters will shift to the
left, right or center automatically.
5.
Press the [CANCEL] button
• This confirms the onscreen display position
and returns the display to the normal screen.
‘Warning
Display
Area’
‘Title
Display’
Press and hold
‘Date/Time
Display’
Warning
Display
Area
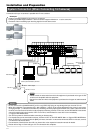
DATE/TIME
TITLE 1 TITLE 2
TITLE 3
TITLE 4
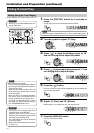
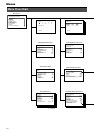
• Press and hold the [EXECUTE] button for
a while when in Quad Picture to switch to
the Onscreen Display Adjustment Screen
as shown in the above diagram.
• Adjust display position in the same way as
described in Steps
1
~
5
.
• Background of the respective displays will
turn blue in the following order every time
when the [EXECUTE] button is pressed:
1 “DATE/TIME”
2 “TITLE 1”
3 “TITLE 2”
4 “TITLE 3”
5 “TITLE 4”
• The ‘Date/Time Display’ and ‘Title Display’
cannot be moved to the Warning Display
Area.
• Camera titles are not shown during display
in 16 split pictures.
<Adjustment of Onscreen Display
Position When in Quad Picture>