


31
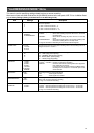
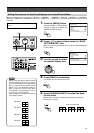
“NETWORK” Menu
[ ● ] are factory settings. (Setting is disabled when in the Recording mode.)
Item Description
“HOST NAME”
“METHOD”
“IP ADDRESS”
“NET MASK”
“DEFAULT GATEWAY”
“NAME SERVER”
“MAC ADDRESS”
vr716
● “STATIC”
“DHCP”
“OFF”
192.168.0.10
255.255.255.0
192.168.0.254
***.***.***.***
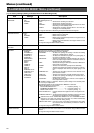
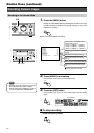
For setting the display name of VR-716 when it is connected to the network.
☞ Page 96 ‘Changing Network Settings of VR-716 from PC’
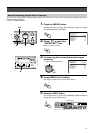
For selecting the method of setting the IP address.
“STATIC” : Select this when connecting to the network without using the DHCP
server. When “STATIC” is selected, the “IP ADDRESS”, “NET MASK”
and “DEFAULT GATEWAY” items will need to be specified as well.
“DHCP” : Select this when connecting to the network using the DHCP server.
“IP ADDRESS”, “NET MASK” and “DEFAULT GATEWAY” will be
automatically assigned by the DHCP server.
When “DHCP” is selected, the IP address will be masked. It will
appear when displaying the “NETWORK” menu again after exiting
it.
“OFF” : Not connected to the network.
☞ Page 96 ‘Changing Network Settings of VR-716 from PC’
For setting the “IP ADDRESS”, “NET MASK”, “DEFAULT GATEWAY” and “NAME
SERVER”.
Setting of these items will be required when “STATIC” is selected in the “METHOD”
item of the “NETWORK” Menu. Ensure that there are no duplicate IP addresses in
the network.
☞ Page 96 ‘Changing Network Settings of VR-716 from PC’
Unique physical address of the product. This address cannot be altered.
• Setting will be disabled when “DHCP” address is selected in the “METHOD”
item of the “NETWORK” Menu. (In this case, only the name server can be
altered.)
Note
A “IP ADDRESS SETTING IN PROGRESS...” message will be displayed on the monitor screen upon changing the network
settings. All operations are disabled when this is shown.
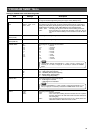
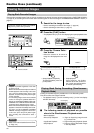
“DISK UTILITY/MAINTENANCE” Menu
[ ● ] are factory settings. (Setting is disabled when in the Recording mode.)
Item Description
“DISK UTILITY”
“AUTO SCAN DISK”
“MANUAL SCAN
DISK”
“DEFRAG AUTO
MODE”
“DEFRAG DATABASE”
“FORMAT”
“MIRRORING”
“MAINTENANCE”
“TOTAL TIME”
“POWER OUTAGE
TIME LIST”
“ON”
● “OFF”
“ON”
● “OFF”
“DATE” “TIME” “SET”
01 00 “ON”
● “OFF”
“YES”
● “NO”
“YES”
● “NO”
“YES”
● “NO”
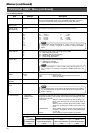
For setting whether to scan disk upon turning “ON” the power of VR-716.
“ON” : Starts to scan disk when the power is ON.
“OFF” : Does not scan disk.
☞ Page 55 ‘Scanning Hard Disk Data (“AUTO SCAN DISK”)’
Scan Disk starts upon setting to “ON” and performing procedures according to the
onscreen message.
☞ Page 56 ‘Scanning Hard Disk Data (“MANUAL SCAN DISK”)’
For performing defrag.
Do so by following procedures according to the onscreen message.
☞ Page 57 ‘Defrag’
For formatting the hard disk.
Do so by following procedures according to the onscreen message.
☞ Page 58 ‘Initializing the Hard Disk (“FORMAT”)’
Specifies the mirroring settings.
Do so by following procedures according to the onscreen message.
☞ Page 59 ‘Hard Disk Mirroring’
Displays the total operating time.
Displays the time at which power failure is detected. Use the [CANCEL] button to
clear the list.
Settings
Settings