


11
•
••••••••••••••••••••••••••••••••••••••••••••••••••••••••••••••••••••••••••••••••••••••••••••••••••••••••••••••••••••
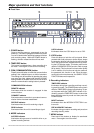
Basic Operations
ENGLISH
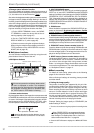
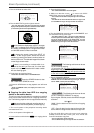
4) The <COPY SELECTION> menu (press the
COPY button to display the menu).
<COPY SELECTION>
@COPY DIRECTION HDD}COPY
OVERWRITE OFF
TRANSFER PERIOD MAN
FROM:06-09-01 18:43:52
TO:06-10-01 18:43:52
EXECUTE OFF
Refer to “Menu functions” on pages 22 - 24
for the construction of the menus.
♦ Setting the present time
Please follow steps below to set the present time.
Example: Setting the present time to 6:30 p.m., March 15,
2001.
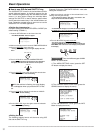
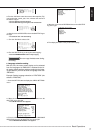
1. Press the SET UP button.
• The <MENU SETTING > menu will appear.
<MENU SETTING>
@TIME DATE DISPLAY
MPX DISPLAY
TIMER PROGRAM
2. Turn the JOG dial to select the INITIAL SET UP, and turn
the SHUTTLE ring to the right.
• The <INITIAL SET UP> menu will appear.
<INITIAL SET UP>
@TIME DATE ADJUST
HDD FULL
HDD PB REPEAT
ARCHIVE OVERWRITE
AUTO EJECT
STOP
STOP
OFF
ON
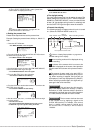
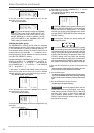
3. Confirm that the cursor is next to the TIME DATE ADJUST,
and turn the SHUTTLE ring to the right.
• The <TIME DATE ADJUST> menu will appear.
4. Turn the SHUTTLE ring to the right twice.
• The sub-item of DATE will start flashing.
<TIME DATE ADJUST>
DAYLIGHT SAVING OUT
DATE 01
MONTH 01
YEAR 2000
5. Turn the JOG dial to set the date number to 15, and turn the
SHUTTLE ring to the right.
• The sub-item of MONTH will start flashing.
<TIME DATE ADJUST>
DAYLIGHT SAVING OUT
DATE 15
MONTH 01
YEAR 2000
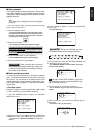
6. Set the month, year, hour, 10 minute digit and minute digit
in a similar fashion.
• Seconds cannot be set.
• The sub-item of DAYLIGHT SAVING will flash when you turn
the SHUTTLE ring to the right after setting the minute.
<TIME DATE ADJUST>
DAYLIGHT SAVING OUT
DATE 15
MONTH 03
YEAR 2001
TIME 18:30:00
TURN THE SHUTTLE RING
< < TO EXECUTE.
7. Turn the SHUTTLE ring to the left to accept the setting.
• The seconds value is reset to “00”, and the display will return
to the <INITIAL SET UP> menu.
♦ The daylight saving
The clock is put forward one hour by setting the menu. The
default setting for this function is “OUT”. On the DAYLIGHT
SAVING in <TIME DATE ADJUST > menu, turn the JOG dial
to flash “IN” (the daylight saving function is activating) and
turn the SHUTTLE ring to the right to enter the selection.
♦ Present time display
The following display will appear when this unit is turned
on. (When the DISPLAY MODE is set to “3”.)
01-01-2001 MON A0001
00:00:00 25F 50% C01
Year
Month
Date
Day of
the week Alarm recording number
Minute
Second
Time
Recording interval
Camera number
Recorded capacity of the Hard Disk
Non-operation camera mark
Refer to “Setting Display Mode” on page 25 for
detailed settings of the display.
Alarm recording number will be displayed during
alarm recording.
If a picture of the camera which is not set to be
operated is displayed on the screen, Non-operation
Camera mark will be shown on the present time dis-
play.
The amount of space used in the total HDD in-
cluding external devices is displayed during record-
ing. When recording is stopped, this figure will not
be displayed. (It will stay displayed during PAUSE.)
When recording is started again, this figure will ap-
pear again after a few moments.
INFORMATION
This unit has a four-digit year dis-
play. It can display dates from January 1, 2000 to
December 31, 2030. It also has a built-in function to
automatically calculate leap years. After December
31, 2030, the date indicator will return to 2000.
INFORMATION
The on-screen clock can be reset
to the nearest hour, by applying a signal to the
CLOCK ADJ terminal. For example, if the current
time is 11:29:59, it will be reset to 11:00:00, and if
the current time is 11:30:00, it will be reset to
12:00:00.