


32
•••••••••••••••••••••••••••••••••••••••••••••••••••••••••••••••••••••••••••••••••••••••••••••••••••••••••••••••••••••••••••••••••••••••••••
•
Various settings (continued)
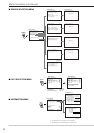
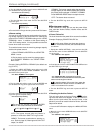
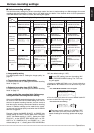
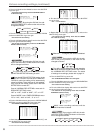
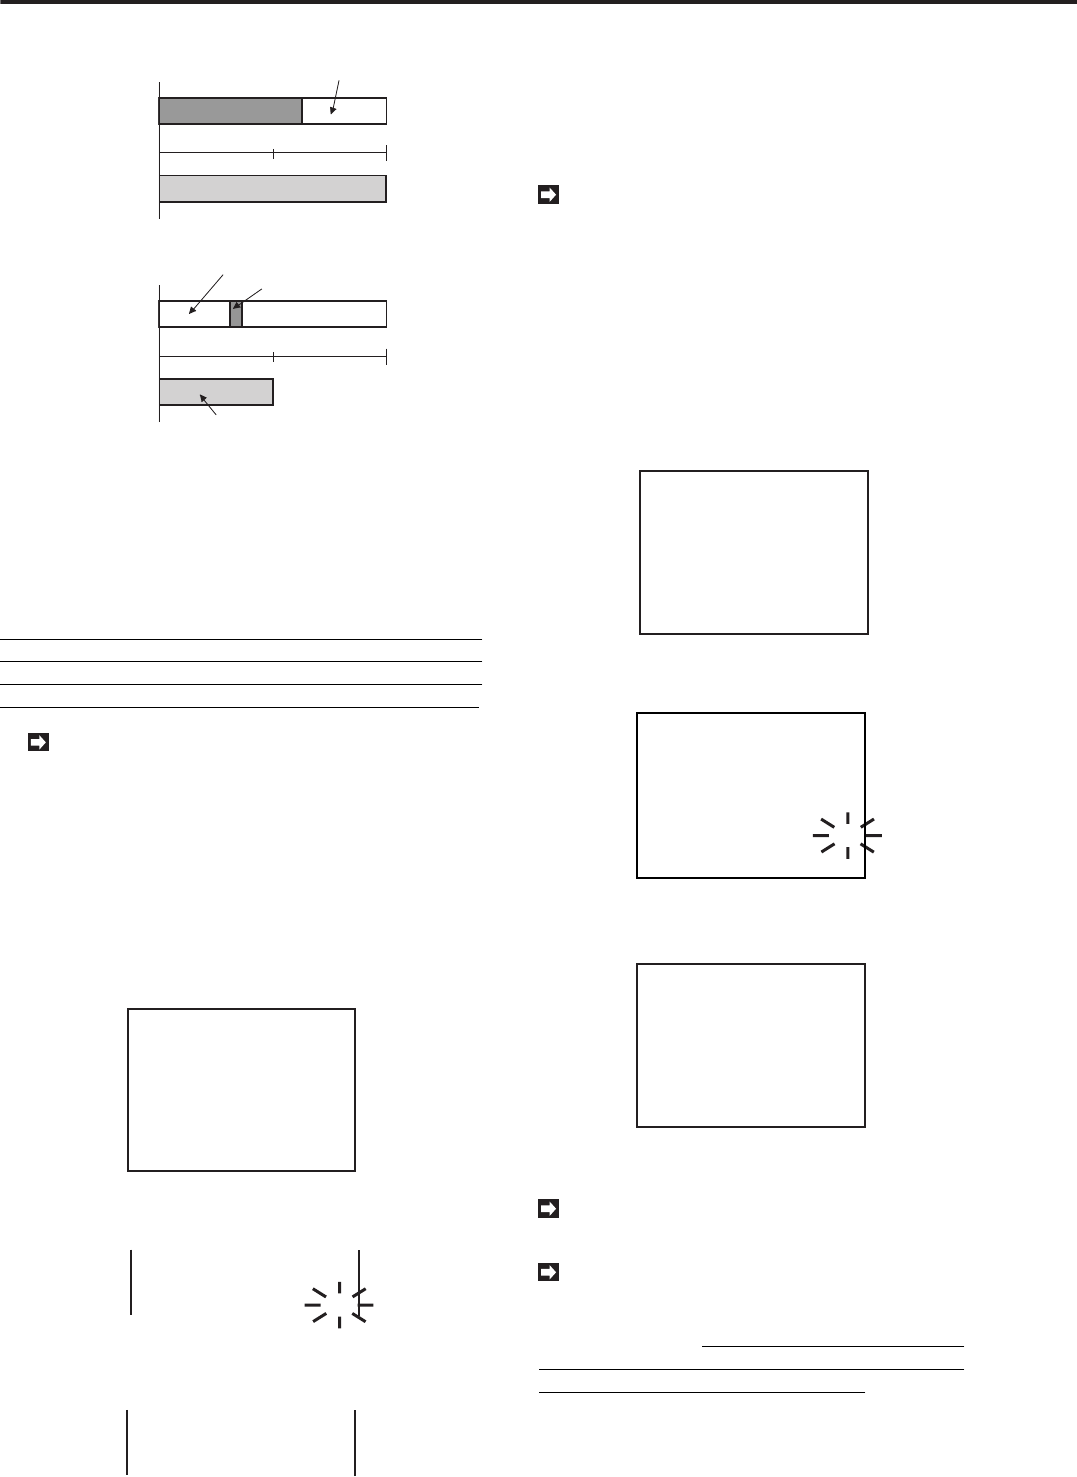
1). Backing up a data block containing the alarm record.
Main
HDD
Archive
media
1MB
1MB
Alarm recording
Backup recording
Normal recording
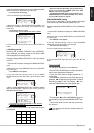
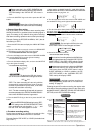
2). Backing up a small alarm record.
Main
HDD
Archive
media
1MB
1MB
Alarm recording
Backup recording
Normal recording
Normal recording
♦ FIFO/OVERWRITE MODE setting
This is the setting for repeated backup to the HDD connected
to ID4. The setting item for this function is displayed in the
menu only when an HDD is connected to ID4. When a power
failure has occurred during a backup, the backup operation
does not recover automatically. Press the ARCHIVE button
to restart the backup. (At the time of timer reservation, backup
restarts automatically after recovery from the power failure.)
At this time, all data backed up until the occurrence of
the power failure will be lost, and the backup pointer
also returns to the backup start point before the occur-
rence of the power failure. Please pay attention to this.
Before making the FIFO/OVERWRITE MODE
setting, confirm that an HDD is connected correctly
to ID4.
Example: Setting FIFO/OVERWRITE MODE to “ON” (the
default is “OFF”).
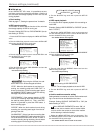
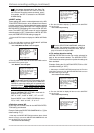
1. Press the SET UP button to display the <MENU SETTING>
menu.
2. Move the cursor to INITIAL SET UP and turn the SHUTTLE
ring to the right.
• The <INITIAL SET UP> menu will be displayed.
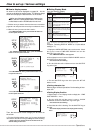
<INITIAL SET UP>
@TIME DATE ADJUST
HDD FULL
HDD PB REPEAT
ARCHIVE OVERWRITE
AUTO EJECT
ARCHIVE DATA
FIFO/OVERWRITE MODE
MOTION DETECTION
LANGUAGE SELECTION
STOP
STOP
OFF
ON
ALL
OFF
OFF
3. Turn the JOG dial move the cursor to FIFO/OVERWRITE
MODE. Turn the SHUTTLE ring to the right.
• Turn the JOG dial to make the selection options flash.
ARCHIVE OVERWRITE OFF
AUTO EJECT OFF
ARCHIVE DATA ALL
@FIFO/OVERWRITE MODE OFF
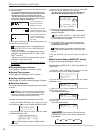
4. Turn the JOG dial to make the “ON” option flash.Turn the
SHUTTLE ring to the right.
• The sub-item stops flashing.
ARCHIVE OVERWRITE OFF
AUTO EJECT OFF
ARCHIVE DATA ALL
@FIFO/OVERWRITE MODE ON
5. Turn the SHUTTLE ring to the left or press the SET UP
button.
♦ Motion Detection setting
To use MOTION DETECTION, first turn the setting “ON” in
the INITIAL SET UP menu.
The <MOTION DETECTION> menu cannot be
displayed when this setting is OFF. The sub menu
of M-DET SETTING menu of A-REC/M-DET SET-
TING cannot be accessed when the MOTION DE-
TECTION is set to OFF.
Example: Setting MOTION DETECTION to “ON” (the de-
fault is “OFF”).
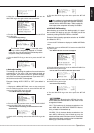
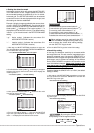
1. Display the <MENU SETTING> menu on the screen and
turn the JOG dial to select the INITIAL SET UP ,and turn the
SHUTTLE ring to the right.
• The <INITIAL SET UP> menu appears.
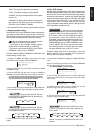
<INITIAL SET UP>
@TIME DATE ADJUST
HDD FULL
HDD PB REPEAT
ARCHIVE OVERWRITE
AUTO EJECT
ARCHIVE DATA
MOTION DETECTION
LANGUAGE SELECTION
STOP
STOP
OFF
ON
ALL
OFF
2. Turn the JOG dial to select the MOTION DETECTION and
turn the SHUTTLE ring to the right.
• The sub-item will start flashing.
<INITIAL SET UP>
TIME DATE ADJUST
HDD FULL
HDD PB REPEAT
ARCHIVE OVERWRITE
AUTO EJECT
ARCHIVE DATA
@MOTION DETECTION
LANGUAGE SELECTION
STOP
STOP
OFF
ON
ALL
OFF
3. Turn the JOG dial until ON flashes and turn the SHUTTLE
ring to the right.
• The sub-item stops flashing.
<INITIAL SET UP>
TIME DATE ADJUST
HDD FULL
HDD PB REPEAT
ARCHIVE OVERWRITE
AUTO EJECT
ARCHIVE DATA
@MOTION DETECTION
LANGUAGE SELECTION
STOP
STOP
OFF
ON
ALL
ON
4. Turn the SHUTTLE ring to the left or press the SET UP
button.
Please set the MOTION DETECTION to “OFF” ,
when the function is not needed.
When the MOTION DETECTION setting in the
INITIAL SET UP menu is turned ON, the MAX REC
FIELDS for each time setting will be automatically
altered as follows. These settings will not auto-
matically revert to their former values even if
MOTION DETECTION is turned OFF.