


ENGLISH
7
•
••••••••••••••••••••••••••••••••••••••••••••••••••••••••••••••••••••••••••••••••••••••••••••••••••••••••••••••••••••••••••••••
Beginning
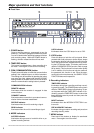
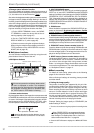
INFO button
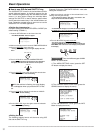
Press this button to display the <INFORMATION>
menu.
SET UP button
Press this button to display the <MENU SETTING>
menu.
COPY button
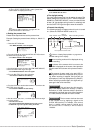
Press this button to display the <COPY SELEC-
TION> menu. This button does not work if the pe-
ripheral device is not connected to SCSI ID 4 or SCSI
ID 5.
SEARCH button
Press this button to display the <SEARCH SELEC-
TION> menu.
COPY indicator
The Indicator will start to blink during Copy or Re-
store operation. This light is on while recorded con-
tent is being copied or during Restore operation.
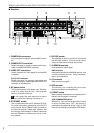
8. WARNING RESET button
Used to clear a warning displayed on the monitor.
9. PLAY DEVICE button
Used to select a playback device. If there is no pe-
ripheral recording device connected, this button can-
not be activated.
EJECT button
Used to eject the medium of playback devices. Use
this button to eject the medium of peripheral record-
ing devices connected to this unit. If there is no pe-
ripheral recording device connected, this button can-
not be used.
10. PLAY DEVICE indicators
The indicator of the device selected by the PLAY
DEVICE button illuminates.
11. STOP button
Press to stop recording or playback. When pressed
during alarm recording, the recording stops. The MO-
TION DETECTION function, the operation can be
frozen for two seconds after pressing the STOP but-
ton to stop the recording by the MOTION DETEC-
TION function.
12. PAUSE button
When pressed during recording, the recording
pauses. Press again to resume recording. When
pressed during playback, a still picture is displayed.
SHUTTLE HOLD button
This button keeps the particular playback or reverse
playback speed depending on the degree to which
the SHUTTLE ring is turned. Refer to the page 56
for operating this button.
13. REV PLAY button
Press to begin reverse playback.
14. PLAY MODE buttons
These buttons can be used to switch the playback
interval while in playback mode and reverse play-
back mode.
15. PLAY button
Press to begin playback.
16. Multiplexer buttons
Camera number button (1 to 16)
Press the button to display the image of the camera
connected to this unit on the monitor. In addition, they
can be used as the PASSWORD LOCK function key.
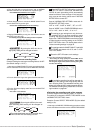
SPLIT/SEQUENCE button
Used to switch the display to the single screen, SPLIT
4 , SPLIT 9 screen or SPLIT 16 screen. Also used to
switch the sequence functions. Refer to page 42 for
details.
ZOOM button
Pressing this button displays the Zoom in pointer (X)
on the monitor. Pressing 1 button (ZOOM IN) en-
larges the selected part, and pressing 2 button
(ZOOM OUT) reduces the image. Pressing 3, 4, 5
or 6 button moves the image to the direction that the
pointer (X) moves. In addition, this can be used as
the PASSWORD LOCK function key.
ZOOM IN button (Camera number button 1)
Pressing this button after pressing the ZOOM button
enlarges the image in 2 steps.
ZOOM OUT button (Camera number button 2)
Pressing this button after pressing the ZOOM IN
button reduces the image.
Move buttons (Camera number button 3 to 6)
Press these buttons to move the ZOOM POINTER
to desired position.
17. REC button
Press to begin recording.
18. ARCHIVE button
Press to begin making backup. If there is no periph-
eral recording device connected, this button cannot
be used.
19. JOG and SHUTTLE operation
SHUTTLE ring
Used to set various menus and search functions,
adjusting the playback speed, and rewinding or for-
warding the image.
JOG dial
Used to set various menus and search functions,
forwarding or reversing the image during playback
(field-by-field).