


89
RQT9487
Convenient
functions
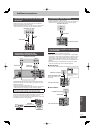
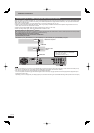
HDMI Connection
Press [OK] to show the following settings.
HDMI Video Mode
Select “On” when video is output from HDMI AV OUT terminal.
[On]
[Off] When the equipment such as amplifi ers is
connected using HDMI cable, and TV is connected
to the COMPONENT VIDEO OUT terminal (setup
before connecting to the amplifi ers.)
HDMI Video Format
You can only select items compatible with the connected
equipment. This setting normally does not need to be changed.
However if you are concerned about output picture quality, it
may be improved by changing the setting.
To enjoy High Quality Video up-converted to 1080p, you need
to connect the unit directly to 1080p compatible HDTV. If this
unit is connected to an HDTV through other equipment, it
must also be 1080p compatible.
[576p/480p]
[720p] All images other than 720p will be output as
1080i.
[1080i]
[1080p] When outputting 1080p signal, we recommend
using High Speed HDMI Cables that have the
HDMI logo (as shown on the cover) and are
less than 5.0 meters to prevent video distortion
etc.
[Automatic] Automatically selects the output resolution best
suited to the connected television (1080p,
1080i, 720p or 576p/480p).
Press and hold [
g
] and [
q
] (PLAY) for more than 5 seconds
when the image is disturbed by changing the setting. It will be
set to “576p/480p”.
HDMI Audio Output
[On]
[Off] When connected to TV with HDMI cable, and
connected to amplifi ers not compatible to HDMI with
the DIGITAL AUDIO OUT terminal
VIERA Link
Set to use “HDAVI Control” function when connected with an
HDMI cable to a device that supports “HDAVI Control”.
[On]
[Off] Select when you do not want to use “HDAVI
Control”.
Component Resolution
This sets the video output resolution when using the component
video terminal.
[576i/480i] [576p/480p] [720p] [1080i]
If it is set to “720p”, images other than “720p” will be output as
“1080i”.
Even if you select “720p” or “1080i”, the video output resolution
is restricted to “576p/480p” when HD contents recorded on this
unit, DVD-Video discs, DivX recorded at a rate of 50 fi elds per
second and images via AV1, AV2 or DV input are output from
the COMPONENT VIDEO OUT terminals.
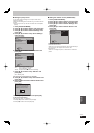
Network Settings
(All factory default settings are indicated with underlined text.)
IP Address/DNS Settings (➡ 92)
Press [OK] to show the following settings.
Connection Test
[--]
IP Address Auto-assignment
[On] [Off]
IP Address
[---.---.---.---]
Subnet Mask
[---.---.---.---]
Gateway Address
[---.---.---.---]
DNS-IP Auto-assignment
[On] [Off]
Primary DNS
[---.---.---.---]
Secondary DNS
[---.---.---.---]
Connection Speed Auto-confi gure
[On] [Off]
Connection Speed Setting
This is enabled only when “Connection Speed Auto-confi gure”
is turned “Off”.
[10BASE half duplex] [10BASE full duplex]
[100BASE half duplex] [100BASE full duplex]
Proxy Server Settings (➡ 93)
Press [OK] to show the following settings.
Initialize
Set the setting of “Proxy Server Settings” back.
Proxy Address
(The initial setting is blank.)
Proxy Port Number
(The initial setting is “0”.)
Connection Test
[----]
Network Service (➡ 93)
Press [OK] to show the following settings.
Network Lock
You can restrict using VIERA CAST.
Follow the on-screen instructions. Enter a 4-digit PIN with the
numbered buttons when the PIN setting screen is shown. It will
be the common PIN for “DVD-Video Ratings” and “Network
Lock”.
Do not forget your PIN.
[On] [Off]
Changing Settings (When “On” is selected)
[Change PIN]
Automatic Volume Control
[On]
[Off] Select “Off” when the audio is warped while using
VIERA CAST.
Picture Zoom
[In]
The picture is enlarged.
[Out] The picture is reduced.
Select “Out” when display of the contents is truncated.