


93
RQT9487
Convenient
functions
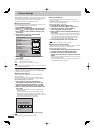
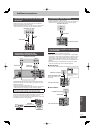
■ Setting the proxy server
In most cases, default settings can normally be used without
making any changes.
Please use this setting when instructed to by your Internet service
provider.
Set the proxy server only after the connection test is completed
properly.
1 Press [FUNCTION MENU].
2 Press [
e
,
r
] to select “Others” and press [OK].
3 Press [
e
,
r
] to select “Setup” and press [OK].
4 Press [
e
,
r
] to select “Network Settings” and
press [OK].
5 Press [
e
,
r
] to select “Proxy Server Settings”
and press [OK].
RETURN
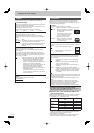
Proxy Server Settings
Initialize
Proxy Address
Proxy Port Number
OK
0
Connection Test
----
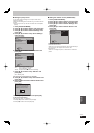
6 Press [
e
,
r
] to select “Connection Test” and
press [OK].
RETURN
Proxy Server Settings
Initialize
Proxy Address
Proxy Port Number
OK
Connection Test
0
----
“Testing”: The test is in progress.
“OK”: The connection is completed.
Press [RETURN ] to exit.
“Failed”: Please check the connection and settings.
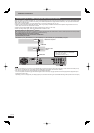
7 Press [
e
,
r
] to select “Proxy Address” and
press [OK].
(➡ 72, Entering text)
After the input of “Proxy Address” is completed
8 Press [
e
,
r
] to select “Proxy Port Number” and
press [OK].
9 Enter numbers with the numbered buttons and
press [OK].
0
Proxy Port Number
Please input HTTP Proxy Server Port Number
and press “OK”. The number will be set to “0”
by pressing “OK” when there is no number
input.
0 - Number9
10 Press [
w
,
q
] to select “Yes” and press [OK].
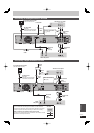
To set back to default setting
After performing steps 1–5 (➡ above)
1 Press [
e
,
r
] to select “Initialize” and press [OK].
2 Press [
w
,
q
] to select “Yes” and press [OK].
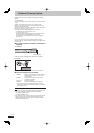
■ Setting the network service (VIERA CAST)
1 Press [FUNCTION MENU].
2 Press [
e
,
r
] to select “Others” and press [OK].
3 Press [
e
,
r
] to select “Setup” and press [OK].
4 Press [
e
,
r
] to select “Network Settings” and
press [OK].
5 Press [
e
,
r
] to select “Network Service” and
press [OK].
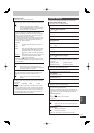
RETURN
Network Service
Network Lock
Automatic Volume Control
Picture Zoom
OK
Off
On
In
Network Lock (➔ 89)
Automatic Volume Control
Select “On”, the volume is controlled by this unit automatically. If
you want to enjoy the original volume, set it to “Off”.
Picture Zoom
Select “In” to enlarge the picture, or select “Out” to reduce the
picture.
•
•
•