


176
Superimposing a still image in
the “Memory Stick” on an image
– MEMORY MIX
Recording superimposed
images on a tape
Before operation
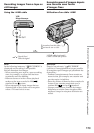
•Insert a tape for recording into your camcorder.
•Insert a “Memory Stick” containing still images
into your camcorder.
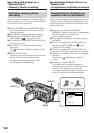
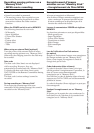
(1)Set the POWER switch to CAMERA.
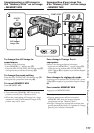
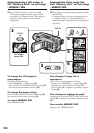
(2)In the standby mode, press MEMORY MIX.
The first recorded image appears in the
bottom-right corner of the screen as a
thumbnail image. The last image that is used
in MEMORY MIX will be displayed next time.
(3)Press MEMORY+/– to select the still image
you want to superimpose.
–:To see the previous image
+:To see the next image
(4)Turn the SEL/PUSH EXEC dial to select the
desired mode.
The mode changes as follows:
M. CHROM y M. LUMI y C. CHROM y
M. OVERLAP
(5)Press the SEL/PUSH EXEC dial.
The still image overlaps with the picture on
the screen.
(6)Turn the SEL/PUSH EXEC dial to adjust the
effect.
M. CHROM – The degree of the blue areas
in the still image which is to
be swapped with a moving
picture
M. LUMI – The brightness of the area in
the still image which is to be
swapped with a moving
picture
C. CHROM –The degree of the blue areas
in the moving picture which
is to be swapped with a still
image
M. OVERLAP –No adjustment necessary
The fewer bars there are on the screen, the
stronger the effect becomes.
(7)Press START/STOP to start recording.
Superposition d’une image fixe
d’un “Memory Stick” sur une image
– MEMORY MIX
Enregistrement d’images
superposées sur une cassette
Avant de commencer
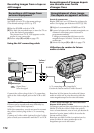
•Insérez une cassette à enregistrer dans votre
caméscope.
•Insérez un “Memory Stick” contenant des
images fixes dans votre caméscope.
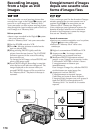
(1)Réglez le commutateur POWER sur
CAMERA.
(2)En mode d’attente, appuyez sur
MEMORY MIX.
L’image enregistrée en premier s’affiche dans
le coin en bas à droite de l’écran comme une
vignette. La dernière image utilisée dans
MEMORY MIX est affichée lors de l’utilisation
suivante.
(3)Appuyez sur MEMORY+/– pour sélectionner
l’image fixe que vous souhaitez superposer.
–:Pour visionner l’image précédente
+:Pour visionner l’image suivante
(4)Tournez la molette SEL/PUSH EXEC pour
sélectionner le mode souhaité.
Le mode change comme suit :
M. CHROM y M. LUMI y C. CHROM y
M. OVERLAP
(5)Appuyez sur la molette SEL/PUSH EXEC.
L’image fixe se superpose à celle affichée à
l’écran.
(6)Tournez la molette SEL/PUSH EXEC pour
régler l’effet.
M. CHROM – Le degré des zones bleues
de l’image fixe devant être
remplacées par une image
animée
M. LUMI – La luminosité de la zone de
l’image fixe devant être
remplacée par une image
animée
C. CHROM – Le degré des zones bleues
de l’image animée devant
être remplacées par une
image fixe
M. OVERLAP – Aucun réglage nécessaire
Moins il y a de barres affichées à l’écran, plus
l’effet est accentué.
(7)Appuyez sur la touche START/STOP pour
lancer l’enregistrement.