


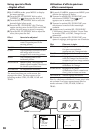


94
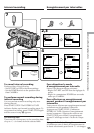
You can make a time-lapse recording by setting
your camcorder to automatically record and
standby sequentially. You can achieve an
excellent recording for flowering, gradual
appearances, etc., with this function.
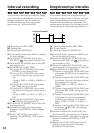
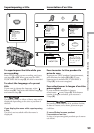
[a] : Recording time (REC TIME)
[b]: Waiting time
[c] : Interval time (INTERVAL)
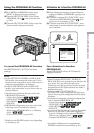
(1)In the standby mode, press MENU to display
the menu settings.
(2)Turn the SEL/PUSH EXEC dial to select
INT. REC in , then press the dial (p. 273).
(3)Turn the SEL/PUSH EXEC dial to select SET,
then press the dial.
(4)Set INTERVAL and REC TIME.
1 Turn the SEL/PUSH EXEC dial to select
INTERVAL, then press the dial.
2 Turn the SEL/PUSH EXEC dial to select
the desired interval time, then press the
dial.
The time: 30SEC y 1MIN y 5MIN y
10MIN
3 Turn the SEL/PUSH EXEC dial to select
REC TIME, then press the dial.
4 Turn the SEL/PUSH EXEC dial to select
the desired recording time, then press the
dial.
The time: 0.5SEC y 1SEC y 1.5SEC y
2SEC
5 Turn the SEL/PUSH EXEC dial to select
RETURN, then press the dial.
(5)Turn the SEL/PUSH EXEC dial to select ON,
then press the dial.
(6)Press MENU to make the menu settings
disappear. The INTERVAL TAPE indicator
flashes.
(7)Press START/STOP to start interval
recording. The INTERVAL TAPE indicator
lights up.
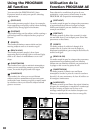
Interval recording
9 MIN 59 S
10 MIN
10 MIN
9 MIN 59 S
1 S
1 S
[a]
[b]
[c]
Example/Exemple
Vous pouvez effectuer un enregistrement par
intervalles en réglant votre caméscope pour qu’il
passe automatiquement du mode de prise de
vues au mode de d’attente en alternance. Cette
fonction permet d’obtenir d’excellentes prises de
vues de floraisons, d’apparitions graduelles, etc..
[a] : Durée d’enregistrement (REC TIME)
[b] : Temps d’attente
[c] : Durée de l’intervalle (INTERVAL)
(1)En mode d’attente, appuyez sur MENU pour
afficher les réglages de menu.
(2)Tournez la molette SEL/PUSH EXEC pour
sélectionner INT. REC sous , puis appuyez
sur la molette (p. 287).
(3)Tournez la molette SEL/PUSH EXEC pour
sélectionner SET, puis appuyez sur la molette.
(4)Réglez INTERVAL et REC TIME.
1 Tournez la molette SEL/PUSH EXEC pour
sélectionner INTERVAL, puis appuyez sur
la molette.
2 Tournez la molette SEL/PUSH EXEC pour
sélectionner l’intervalle de temps souhaité,
puis appuyez sur la molette.
Durée : 30SEC y 1MIN y 5MIN y
10MIN
3 Tournez la molette SEL/PUSH EXEC pour
sélectionner REC TIME, puis appuyez sur
la molette.
4 Tournez la molette SEL/PUSH EXEC pour
sélectionner la durée d’enregistrement
souhaitée, puis appuyez sur la molette.
Durée : 0.5SEC y 1SEC y 1.5SEC y
2SEC
5 Tournez la molette SEL/PUSH EXEC pour
sélectionner RETURN, puis appuyez
sur la molette.
(5)Tournez la molette SEL/PUSH EXEC pour
sélectionner ON, puis appuyez sur la molette.
(6)Appuyez sur MENU pour quitter les réglages
de menu. L’indicateur INTERVAL TAPE
clignote.
(7)Appuyez sur START/STOP pour activer la
prise de vue par intervalle. L’indicateur
INTERVAL TAPE s’allume.
Enregistrement par intervalles