


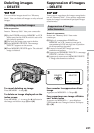
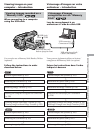

224
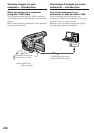
You can specify a recorded still image to print
out by writing a print mark. This function is
useful for printing out still images later.
Your camcorder conforms to the DPOF (Digital
Print Order Format) standard for specifying still
images to print out.
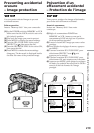
Before operation
Insert a “Memory Stick” into your camcorder.
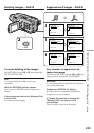
(1)Set the POWER switch to MEMORY or VCR.
Make sure that the LOCK switch is set to the
left (unlock) position.
(2)Play back the still image you want to write a
print mark on.
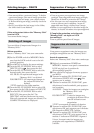
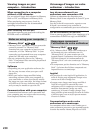
(3)Press MENU to display the menu settings.
(4)Turn the SEL/PUSH EXEC dial to select
PRINT MARK in
1
, then press the dial.
(5)Turn the SEL/PUSH EXEC dial to select ON,
then press the dial.
(6)Press MENU to make the menu settings
disappear. The mark is displayed beside
the data file name of the image with a print
mark.
Writing a print mark
– PRINT MARK
3,6
MENU
4
5
MEM SET 1
STILL SET
MOVIE SET
NEW FOLDER
REC FOLDER
FILE NO.
PRINT MARK
PROTECT
PB FOLDER
RETURN
OFF
[
MENU
]
:
END
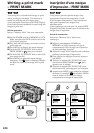
MEM SET 1
STILL SET
MOVIE SET
NEW FOLDER
REC FOLDER
FILE NO.
PRINT MARK
PROTECT
PB FOLDER
RETURN
ON
OFF
[
MENU
]
:
END
MEM SET 1
STILL SET
MOVIE SET
NEW FOLDER
REC FOLDER
FILE NO.
PRINT MARK
PROTECT
PB FOLDER
RETURN
ON
OFF
[
MENU
]
:
END
MEM SET 1
STILL SET
MOVIE SET
NEW FOLDER
REC FOLDER
FILE NO.
PRINT MARK
PROTECT
PB FOLDER
RETURN
ON
[
MENU
]
:
END
1
2
1
2
1
2
1
2
21/40
21/4021/40
21/40
Vous pouvez préciser quelles images fixes
enregistrées doivent être imprimées à l’aide
d’une marque d’impression. Cette fonction est
utile pour imprimer des images fixes
ultérieurement.
Votre caméscope est conforme à la norme DPOF
(Digital Print Order Format) pour la sélection des
images fixes à imprimer.
Avant de commencer
Insérez un “Memory Stick” dans votre
caméscope.
(1)Réglez le commutateur POWER sur
MEMORY ou VCR. Assurez-vous que le
commutateur LOCK est réglé sur la position
de déverrouillage (gauche).
(2)Affichez l’image fixe à laquelle vous souhaitez
attribuer une marque d’impression.
(3)Pour afficher les réglages de menu, appuyez
sur MENU.
(4)Tournez la molette SEL/PUSH EXEC pour
sélectionner PRINT MARK sous
1
, puis
appuyez sur la molette.
(5)Tournez la molette SEL/PUSH EXEC pour
sélectionner ON, puis appuyez sur la molette.
(6)Appuyez sur MENU pour quitter les réglages
de menu. Le symbole est affiché à côté du
nom de fichier de données de l’image
comportant une marque d’impression.
Inscription d’une marque
d’impression – PRINT MARK