


42
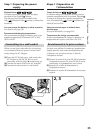
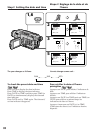
Your camcorder automatically focuses.
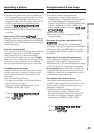
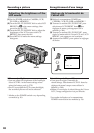
(1)Remove the lens cap and attach the lens cap to
the grip strap.
(2)Install the power source and insert a cassette.
See “Step 1” to “Step 3” for more information
(p. 28 to 41).
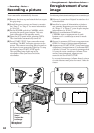
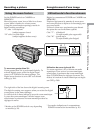
(3)Set the POWER switch to CAMERA while
pressing the small green button. This sets
your camcorder to the standby mode.
(4)Open the LCD panel while pressing OPEN.
The viewfinder automatically turns off.
(5)Press START/STOP. Your camcorder starts
recording. The REC indicator appears on the
screen. The camera recording lamp located on
the front of your camcorder lights up. To stop
recording, press START/STOP again.
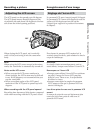
The recording lamp lights up in the
viewfinder when you record with the
viewfinder.
— Recording – Basics —
Recording a picture
5
3
4
1
2
50min
REC
0:00:01
SP
C
A
M
E
R
A
M
E
M
O
R
Y
V
C
R
O
F
F
(
C
H
G
)
POWER
Camera recording
lamp/
Voyant de
tournage
Microphone/
Microphone
La mise au point est automatique sur ce caméscope.
(1)Enlevez le capuchon d’objectif et attachez-le à
la bandoulière.
(2)Installez la source d’alimentation et insérez
une cassette. Reportez-vous aux indications
de “Etape 1” à “Etape 3” pour de plus amples
informations (p. 28 à 41).
(3)Réglez le commutateur POWER sur
CAMERA tout en appuyant sur le petit
bouton vert. Le caméscope se met en mode
d’attente.
(4)Ouvrez le panneau LCD tout en appuyant sur
OPEN. Le viseur s’éteint automatiquement.
(5)Appuyez sur START/STOP. Votre caméscope
commence l’enregistrement. L’indicateur REC
s’affiche à l’écran. Le voyant de tournage situé
à l’avant de votre caméscope s’allume. Pour
arrêter l’enregistrement, appuyez une
nouvelle fois sur START/STOP.
Le voyant de tournage s’allume dans le viseur
si vous effectuez une prise de vues à l’aide du
viseur.
— Enregistrement – Opérations de base —
Enregistrement d’une
image