


110
A/C-7P RO, A/C-7S RO
Follow the steps below to start the
self-test from your PC or terminal.
1.Verify that the printer is
connected properly to the A/C-7
RO and in “READY” mode.
2.Type “&%Z98,1” on the screen.
3.Send that command to the
printer (press the Print Screen
Button or print the
document/file that contains the
Host/PC download command).
The self-test will print out in a
few seconds.
Follow the steps below to start the
self-test by setting the configuration
switches.
1.Verify that the printer is
connected properly to the A/C-7
RO.
2.Power off the A/C-7 RO and the
printer.
3.Set configuration switch SW1:8
(far right of first switch bank) to
“|” and configuration switch
SW1:1 to “o”.
4.Power on the printer and the
A/C-7 RO. A self-test will print
within a few seconds after power
up. After the self-test prints, the
LED lights labeled “Host Ready”
and “Printer Ready” begin
blinking, indicating that the
Print Box is not in operating
mode.
5.Return configuration switch
SW1:8 to the “o” position, then
cycle the power one more time.
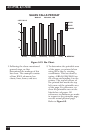
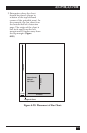
Two self-test pages will print if the
A/C-7 RO is installed properly.
Sample printouts of the first page
are shown in Figures 3-1 and 3-2.
The selections in the sample are
factory defaults. The numbers at the
left margin are command numbers
used to change this setting using
host download commands.
If the test does not print, the A/C-
7 RO failed the self-test. Contact
technical support for more
information.
7.2 EBCDIC Hex Dump
The A/C-7 RO can be set up to print
the buffer in hexadecimal EBCDIC
code. This can be useful for a
technician to diagnose problems
with the A/C-7 RO or the printer.
The EBCDIC hex data is printed
on a grid corresponding to the
data’s position in the buffer. If the
hex data represents a printable
character, that character is printed
below the hex data.
To start the EBCDIC hex dump
through Host/PC Download:
1.Verify that the printer is
connected properly to the A/C-7
RO.
2.Type “&%Z42,1” on the screen.