


61
206-4272
IP Environment Setup (Cont.)
PRE
-
LOADED APPS
Application1
Application2
Application3
Application4
Application5
Application6
Pro:Centric
Network
Pre-loaded Apps
(Continued from previous page)
3. If desired, you can specify a name for this STB so that it is easy
to identify and differentiate from other STBs/TVs for which sharing
has been enabled.
To edit the STB name (default: STB’s serial number), use the Up/
Down arrow keys to select the TV Name eld,andthenpressOK.
You can then use the number keys on the Installer Remote to direct
enter a numeric STB name, or you can use the arrow keys to select
the appropriate alphanumeric character(s) from the pop-up virtual
keyboard at the bottom of the screen. When you are done, select
Enter from the virtual keyboard, and then press OK on the Installer
Remote.
4. Oncealleldsarecompletedasrequired,use the arrow keys on
the Installer Remote to return to the IP Environment Menu, as
necessary, or press
to return to the Network Menu and/or exit the
IP Environment Menu.
Note: While Smart Share, Screen Share, and DMR settings are
clonable, SoftAP settings, as well as the STB name, cannot be cloned.
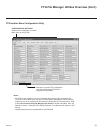
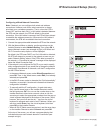
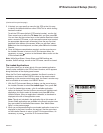
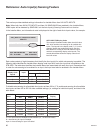
Pre-loaded Applications
This option allows you to select which of the pre-loaded application
icons to make available in the STB’s Smart Launcher, which appears
along the bottom of the display panel screen.
When the Pro:Centric application is disabled, the Smart Launcher is
available to end users via the PORTAL button on the remote control.
Depending on the remote control being used, the Smart Launcher may
also be available to end users via a SMART button.
1. With the IP Environment Menu on display, use the arrow keys on
the Installer Remote to select Pre-loaded Apps. Then, press OK.
2. In the Pre-loaded Apps screen, a list of available application
options is displayed. Use the Up/Down arrow keys to highlight each
application you wish to select or de-select, and press OK on the
Installer Remote. When an application is selected, a checkmark is
displayed at the left of the application name.
Note: Though not included in the application list on this screen, all
Screen Share applications are available in the Smart Launcher once
they are enabled in the Media Share screen. See “Media Share
Setup” on the previous page.
3. When you are done selecting the pre-loaded application icons to be
displayed in the Smart Launcher, as required, use the arrow keys
on the Installer Remote to return to the IP Environment Menu, as
necessary, or press
to exit the IP Environment Menu.