


••••••••••••••••••••••••••••••••••••••••••••••••••••••••••••••••••••••••••••••••••••••••••••••••••••••••••••••••••••••••••••••••••••••••••••••••••••••••••
10
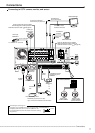
Connections
• Connections for camera, monitor, and sensor.
See “ Connecting to CCTV camera, monitor,
and sensor” on page 17.
• Connection for the alarm recording.
See “ Alarm recording connection” on page
18 and “ Rear view” on pages 15, 16.
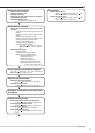
Boot-up the unit
When executing Setup Wizard:
See “ Setup Wizard” on pages 30, 31.
Only when the unit is turned on for the first time, the
<Setup Wizard> screen is displayed automatically. It
is not displayed next time.
• The language, present time, HDD configuration, and
recording settings are set automatically by following
the instructions in the menu.
Making the initial menu settings
• Setting the present time display mode.
See “ On Screen Information” on page 69.
• Setting the audio recording.
See “ Audio Recording Setup” on page 55 and
“ Continuous recording time table” on pages 110, 111.
Making the HDD settings
• Setting the repeat recording.
See “ Data Management Setting for Main
Memory” on page 82.
• Setting the remaining HDD capacity.
See “Low Memory Alarm Setting” on pages 60
and 61.
• Setting the CALL OUT.
See “ Call Out Settings” on pages 60 and 61.
• Setting the buzzer.
See “ Buzzer” on page 61.
Making the multiplexer settings
• Making the split screen settings.
See “ Multiplexer Setting” on pages 66, 67.
• Making the sequence setting.
See “ Multiplexer Setting” on pages 66, 67.
Setting other various functions
• Setting the camera title/recorder title.
See “ Camera Title” and “ Recorder Title” on
page 69, 70.
• Setting the display mode.
See “ On Screen Information” on page 69.
• Setting the output signal of the unit status.
See “ Mode Out Settings” on pages 60 and
61.
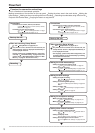
Flowchart
Flowchart for connection and settings
This is a flowchart of the example operation:
Making connections of the terminal on the rear panel Setting the alarm area in the main device Making the
initial settings
Making an alarm recording with timer recording Searching recorded data using the alarm list
Playback the recorded data Copying the data to a copy device.
Connections
• Connections for camera, monitor, and sensor.
See “ Connecting to CCTV camera, monitor,
and sensor” on page 17.
• Connection for the alarm recording.
See “ Alarm recording connection” on page
18 and “ Rear view” on pages 15, 16.
Boot-up the unit
When not executing Setup Wizard:
See “ Setup Wizard” on pages 30, 31.
Only when the unit is turned on for the first time, the
<Setup Wizard> screen is displayed automatically. It
is not displayed next time.
• Set the present time and HDD settings in each menu
manually. (“
Time/Date Setting” on page 60. Set the
present time.“ Data Management Setting for Main
Memory” on page 82. Set the alarm area.)
Recording