


52
••••••••••••••••••••••••••••••••••••••••••••••••••••••••••••••••••••••••••••••••••••••••••••••••••••••••••••••••••••••••••••••••••••••••••••••••••••••••••
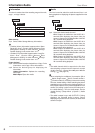
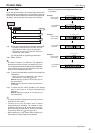
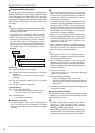
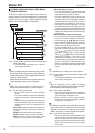
Recording (continued) Setup Menu
(Normal recording settings)
step1. Follow the steps 1 and 2 on page 97 to set the
recording camera, frame or field recording, recording
rate, and picture grade for normal recording.
• After executing the camera check, the recording
setting is made only for the camera numbers with the
video signal input when using auto or easy setting.
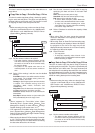
<Estimated Recording Time>
• The continuous recordable time depending on the
recording rate and the recording picture grade of
normal recording is displayed as <Estimated
Recording Time> on the bottom of the preview
screen for normal recording.
• When the main device is partitioned, <Estimated
Recording Time> shows the estimated recordable
time for normal recording.
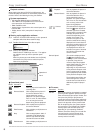
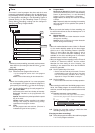
(Alarm recording settings)
step2. Set the frame or field recording, maximum recording
rate per camera, and picture grade for alarm
recording.
Easy: Sets the frame or field recording, maximum
recording rate per camera, and picture grade for
alarm recording to the same settings for all the
camera numbers. When the recording rate is set to
“– – –” for all the camera numbers, this disables
alarm recording. Set the desired settings and then
select “Execute.”
• The preview screen appears automatically when
the easy setting is executed.
Manual: Sets the frame or field recording, maximum
recording rate, and picture grade for alarm recording
individually for each camera number. When setting
“– – –” for the recording rate, recording is disabled
for that camera number.
• Select “View” and display the preview screen to
check the settings you have set.
• The recording rate to be set for normal and alarm
recordings are the maximum number of frames. The
number may decrease depending on the number of
cameras used for recording.
• The field recording and frame recording can be mixed.
However, when the total number of fields and frames
becomes nearly 240, the recording may not follow
the setting. The priority of the recording rate setting
is, frame recording > field recording > large recording
rate > small recording rate > small camera number >
large camera number.
• Make sure to check the settings in the preview screen
after making the recording settings.
• When the picture is recorded at the maximum
recording rate, a picture from the camera without
recording cannot be checked through communication.
• When setting the frame recording, the recording rate
display in the preview screen turns green.
• The recording rate display in the preview screen turns
red when the value exceeds 240 pps in total.
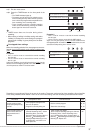
step3. Select motion detection recording.
Alarm: Starts alarm recording when the motion is
detected.
Normal: Starts normal recording when the motion
is detected. The recording is executed at the picture
grade and the recording rate set for normal
recording. The recording is not registered in the
alarm list.
step4. Set the alarm mode.
Alarm CH: When alarm signal is input, performs
alarm recording only by the cameras set for alarm
recording. When there is an input of alarm signals
from multiple sensors, alarm recording is performed
by all the cameras to which alarm signals are input.
Alarm Plus: When an alarm signal is input during
normal recording, performs alarm recording by the
camera and the recording rate set for alarm
recording while all the other cameras perform
recording at the normal recording rate. The available
recording rate for alarm and normal recordings is
up to 240 pps in total.
step5. Set the pre-alarm recording time in “Pre-Alarm
Duration.”
0 sec: Does not execute the pre-alarm recording.
• The pre-alarm recording time display turns red
when the actual pre-alarm recording time
becomes shorter than the set time depending on
the alarm recording settings.
• When the pre-alarm recording time setting exceeds
the maximum pre-alarm recordable time, the pre-
alarm recording time display turns red. Set the time
within the maximum recordable time. You can adjust
the recording rate or picture grade for adjusting the
pre-alarm recording time. Even if the time is set
exceeding the maximum recordable time, the actual
pre-alarm recording is performed for the maximum
recordable time.
• When the alarm area is set, the alarm recording and
pre-alarm recording are made in the alarm area. To
playback the recorded data, set the <Select Source
Device> to “Alarm.”
• In the case that the alarm recording mode for pre-
alarm recording is set to “Alarm CH,” recording with
all the camera numbers set for alarm recording may
not be possible when pre-alarm recording is carried
out during normal recording.
• To perform the pre-alarm recording by all the camera
numbers set for alarm recording:
i) To perform with normal recording:
Set all the desired cameras for normal recording.
Pre-alarm recording is performed at the picture
grade and the recording rate set for normal
recording.
ii) To perform with normal and alarm recordings:
Set the “Alarm Mode” to “Alarm Plus.”
(Normal recording) Set all the desired cameras for
normal recording. Pre-alarm recording is performed
at the picture grade and the recording rate set for
normal recording.