


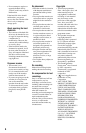
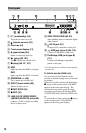
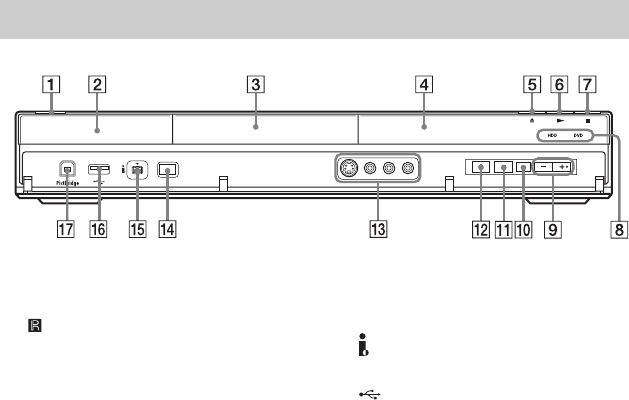
12
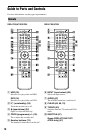
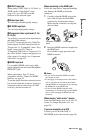
A [/1 (on/standby) (25)
Turns the recorder on or off.
B (remote sensor) (23)
C Disc tray (34)
D Front panel display (13)
E Z (open/close) (34)
Opens or closes the disc tray.
F N (play) (65, 107)
The N button has a tactile dot*.
G x (stop) (65, 97, 107)
H HDD
Lights up when the HDD is selected.
DVD
Lights up when the DVD is selected.
I PROGRAM +/– (35)
The + button has a tactile dot*.
J INPUT (input select) (63)
Selects an input source.
K x REC STOP (35)
L z REC (35)
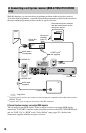
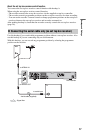
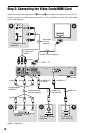
M LINE 2 IN (S VIDEO/VIDEO/
L(MONO) AUDIO R) jacks (30)
Connect a VCR or similar recording
device to these jacks.
N ONE-TOUCH DUB (89, 93)
Starts dubbing from a connected digital
video camera.
O DV IN jack (91)
Connect a DV camcorder to this jack.
P USB jack (type A) (95, 101)
Connect a USB device to this jack.
Q PictBridge USB jack (type B)
(111)
Connect a PictBridge-compatible
printer to this jack.
* Use the tactile dot as a reference when operating
the recorder.
To lock the recorder (Child Lock)
You can lock all of the buttons on the
recorder so that the settings are not cancelled
by mistake.
When the recorder is turned off, hold down
x (stop) on the recorder until “LOCKED”
appears in the front panel display. The
recorder does not work except for timer
recordings and Synchro-Recording (RDR-
AT100/AT200 only) while the Child Lock is
set.
To unlock the recorder, hold down x (stop)
on the recorder until “UNLOCKED”
appears in the front panel display.
Front panel