


96
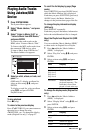
6 Select “Edit” using M/m, and press
ENTER.
7 Select an item using M/m, and press
ENTER.
To copy all albums, select “Copy all to
HDD.”
To copy the selected albums, select
“Copy to HDD.”
The display asks for confirmation.
8 Select “Yes” using </,, and
press ENTER.
The albums are copied to the HDD.
• To copy more albums, repeat from
step 5.
To cancel copying
Press ENTER.
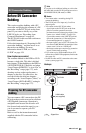
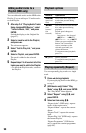
1 Insert a disc that you are going to
copy to the HDD.
2 Press SYSTEM MENU.
The System Menu appears.
3 Select “Dubbing,” and press ENTER.
4 Select “DVD/CD -> HDD” using M/m,
and press ENTER.
The copying starts.
To cancel copying
Press ENTER.
b Note
Before copying, select “CD” or “MP3” under
“Data Format” in the Title List (DVD/CD)
(page 66).
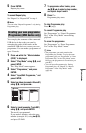
1 Press SYSTEM MENU.
The System Menu appears.
2 Select “Music Jukebox,” and press
ENTER.
3 Select “Listen to Music / Edit,” and
press ENTER.
The “Music Jukebox (HDD)” appears.
4 Select an artist using M/m, and press
ENTER.
5 Select an album using M/m, and
press ENTER.
If you want to copy the album, press ,
instead of ENTER, then go to step 7.
6 Select a track to copy using M/m, and
press ,.
The sub-menu appears.
7 Select “Edit” using M/m, and press
ENTER.
8 Select “Copy Album” or “Copy
Track” using M/m, and press ENTER.
9 Select a copy destination (an artist or
album) using M/m, and press ENTER.
The display asks for confirmation.
10
Select “Yes” using </,, and
press ENTER.
The albums or tracks are copied to the
HDD.
• To copy more tracks or albums, repeat
from step 4.
To cancel copying
Press ENTER.
Copying audio tracks
(DISC t HDD)
Copying tracks or albums on
the HDD (HDD y HDD)