


15
Hookups and Settings
Hookups and Settings
Hooking Up the Recorder
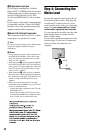
Follow steps 1 through 6 to hook up and
adjust the settings of the recorder. Do not
connect the mains lead until you reach
“Step 4: Connecting the Mains Lead” on
page 22.
b Notes
• See “Specifications” (page 155) for a list of
supplied accessories.
• Plug in cords securely to prevent unwanted
noise.
• Refer to the instructions supplied with the
components to be connected.
• You cannot connect this recorder to a TV that
does not have a SCART or video input jack.
• Be sure to disconnect the mains lead of each
component before connecting.
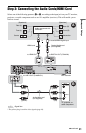
Step 1: Connecting the
Aerial Cable and Set Top
Box Controller
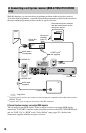
Select one of the following aerial hookups.
Do NOT set “LINE 1 In” to “Decoder” in the
“Video In/Out” setup (page 123) when
making connection A.
“Standby Mode” is set to “Mode 1” (default)
in the “Basic” setup and the picture does not
appear on the TV when the recorder is in
standby mode.
To watch TV in standby mode, set “Standby
Mode” to “Mode 2” in “Step 6: Easy Setup”
(page 25) or use a splitter to divide aerial
input signals between the TV and the
recorder.
z Hint
You can also set “Standby Mode” to “Mode 2” in
the “Basic” setup (page 118).
b Notes
• If your aerial is a flat cable (300-ohm twin lead
cable), use an external aerial connector (not
supplied) to connect the aerial to the recorder.
• If you have separate cables for AERIAL
antennas, use an AERIAL UHF/VHF band
mixer (not supplied) to connect the aerial to the
recorder.
• If you disconnect the recorder’s mains lead, you
will not be able to view the signals from the
connected set top box receiver.
If you have Hookup
Set top box receiver A (page 16)
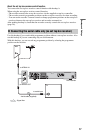
No set top box receiver B (page 17)
,continued