


93
DV Camcorder Dubbing
Dubbing an Entire DV
Format Tape (DV One-
Touch Dubbing)
You can record the entire contents of a DV/
Digital8 format tape onto a disc with a single
press of the ONE-TOUCH DUB button on
the recorder. The recorder controls the DV
camcorder for the whole process, and
completes the recording.
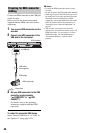
Follow steps 1 to 5 of “Preparing for DV
camcorder dubbing” on page 91, and
press ONE-TOUCH DUB on the recorder.
The recorder rewinds the tape and then starts
recording the tape contents.
After the recording is finished, the recorder
rewinds the tape in the DV camcorder, and
finalises the recorded disc (except DVD-
RW/DVD-R (VR mode)) automatically.
To stop during recording
Press and hold x REC STOP for more than
3 seconds.
Note that it may take a few seconds for the
recorder to stop recording.
b Notes
• When a blank space between the recordings on
the tape continues for more than two minutes,
DV One-Touch Dubbing ends automatically.
• The recorder will pause recording when there is
a blank space or an image containing copy
protection signals on the tape. The recorder will
resume recording automatically when receiving
a recordable signal.
• Finalisation is cancelled if a timer recording
starts (except for DVD-RW/DVD-R (VR
mode)).
• DV One-Touch Dubbing ends automatically
when there are images containing copy
protection signals at the beginning of the tape.
• If the HDD camcorder is also connected to the
USB jack, dubbing from the HDD camcorder
starts when you press the ONE-TOUCH DUB
button. Disconnect the HDD camcorder from the
USB jack to dub from the DV camcorder.
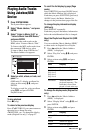
Dubbing Selected
Scenes (DV Manual
Dubbing)
You can select and dub scenes while playing
a DV/Digital8 format tape.
1 Follow steps 1 to 5 of “Preparing for
DV camcorder dubbing” on page 91.
2 Press SYSTEM MENU.
The System Menu appears.
3 Select “HDD-Cam/DV,” and press
ENTER.
4 Select “DV Manual Dubbing,” and
press ENTER.
5 Select the recording destination,
“Record to Hard Disk Drive” or
“Record to DVD,” and press ENTER.
6 Press H.
The scene starts to play.
7 Find the point on the DV/Digital8
format tape that you want to start
dubbing from using m/M or c/
C, and press X.
8 Select “Start Rec.,” and press
ENTER.
The recorder starts dubbing.
9 Select “Pause Rec,” and press
ENTER.
The recorder pauses dubbing.
10
Repeat steps 6 to 9 to dub more
scenes.
11
Select “Stop Rec,” and press ENTER.
The selected scenes are dubbed as a
single title.
To exit “DV Manual Dubbing”
Press SYSTEM MENU.
+
RW
-
RWVR
-
RW
Video
-
RVR
+
R
HDD
-
R
Video
+
RW
-
RWVR
-
RW
Video
-
RVR
+
R
HDD
-
R
Video
,continued