


25
PD-6
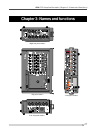
DVD Location Recorder (Chapter 2: Before using the PD-6)
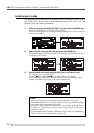
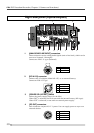
5) Press the [ENTER] key twice to highlight “[EXECUTE]” and press the [ENTER]
key again.
The display changes to show the caution message, in which “Are you sure?”
flashes.
6) Press the [ENTER] key.
Formatting starts.
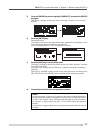
The display now shows the approximate time required for formatting, as well
as the bar-graph meter which shows the progress.
When formatting finishes, “Fmt. Completed!” is shown.
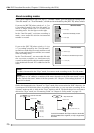
7) Press the [EXIT] key to exit the Utility mode.
The display changes to shows the normal screen, on which “No Files!” is shown
in the file name field.
The disk is now formatted with UDF Rev1.5 and you can make recording or
playback.
The level, TC and BWF sections on the screen show the status according to the
[REC TR], [FS/24] and [FRAME] switch positions when formatting started.
8) Format disk side B with the same procedure as above.
<Note>
On rare occasions, “Disk error!” appears on the display and the disk lock is
released after formatting is completed. In such a case, set “Physical format”
to “ON” in the “Format” menu and format the disk again (see “Format menu”
in “Chapter 8: Utility mode” on page 115 for details about the physical
format).
If “Disk error!” appears again after carrying out physical format, do not use
the disk.