


40
PD-6
DVD Location Recorder (Chapter 3: Names and functions)
<Note>
See “Chapter 2: Before using the PD-6” on page 26 for details about the recording
track modes.
<Note>
When a “Normal” mode audio file is played back, the level meters show the
levels of tracks selected by the [REC TR] select switch.
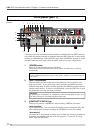
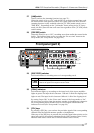
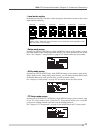
6. [AUDIO FILE] select switch
Selects the file format (BWF or OPT) of a recording audio file. While the file is
played back, the switch setting takes priority.
<Note>
This software version does not support the “OPT” position. Always use the unit
with the [AUDIO FILE] select switch set to “BWF”.
7. [TC OUT] switch
Selects the time code source (REPRO or GEN) fed from the [TIME CODE OUT]
connector.
<Note>
See “Chapter 6: TC Setup mode” for details about output time code setting.
8. [PULL UP/DOWN] switch
Selects pull-up (+0.1 %) or pull-down (-0.1 %) of the sampling clock. The current
TC frame rate also changes according to the switch position.
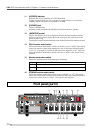
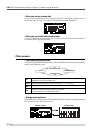
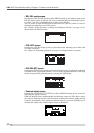
9. [OPEN] lever
Opens the tray protection cover.
To close the cover, press down the cover.
10. [EJECT] lever
Opens the disk tray.
When a disk is set on the tray, release the disk lock by pressing the [DISC
UNLOCK] button before sliding the [EJECT] lever.
Normally, when no disk is set on the tray or the power is off, you can open the
tray by only sliding the [EJECT] lever.
<Note>
On rare occasions, the disk lock may not be released. In such a case, turn off
and on the power, then use the [DISC UNLOCK] button to release the disk lock.
11. [DISC UNLOCK] button
Releases the disk lock. This button is effective only when a disk is set on the
tray.
To remove a disk, press this button then slide the [EJECT] lever to open the
disk tray.
12. Disk tray
Sets a DVD-RAM disk.
To open the disk tray, use the [DISC UNLOCK] button and [EJECT] lever as
described above. To close the disk tray, press down the tray.