


hp dvd-writer
hp dvd-writerhp dvd-writer
hp dvd-writer
dvd100i
dvd100idvd100i
dvd100i
Technical Support Solutions Guide 10/25/01 HP RecordNow 3.0
56
5656
56
⇐
⇐⇐
⇐
⇒
⇒⇒
⇒
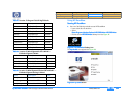
Making a Data Disc
Making a Data DiscMaking a Data Disc
Making a Data Disc
Use the Data Disc recording feature to copy data from your hard drive to a CD.
To create a data disc:
1.
1.1.
1. Click the Make a Data Disc
Make a Data Disc Make a Data Disc
Make a Data Disc button. HP RecordNow automatically opens your
recorder drive.
2.
2.2.
2. Insert a blank or appendable disc into your recorder.
NOTE:
NOTE: NOTE:
NOTE:
If you wish to use a different disc drive to read your disc, click the Change
ChangeChange
Change
button (see Changing CD Recorder drives on page 61 for more
information on this option).
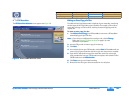
3.
3.3.
3. Select the files or folders you wish to copy to your disc by one of the following
methods:
• Click Add Files or Folders
Add Files or FoldersAdd Files or Folders
Add Files or Folders, highlight the files or folders you want to copy,
then click the Add
AddAdd
Add button.
• Drag and drop files and folders directly from Windows Explorer to the HP
RecordNow screen (see Dragging files from Windows Explorer to HP
RecordNow on page 61 for more information on this option).
NOTE:
NOTE: NOTE:
NOTE:
If you wish to remove any files from your list of files to record, highlight the
file(s) you wish to remove then click the Remove
RemoveRemove
Remove button. Removing files
from your copy job will not remove these files from your hard drive.
4.
4.4.
4. Once you have selected the files to record, click Next
NextNext
Next. HP RecordNow begins
recording data to your disc.
5.
5.5.
5. If you want another copy of your file list at this time, remove the newly recorded
disc, insert another blank or appendable disc into your recorder, then click Make
Make Make
Make
Another
AnotherAnother
Another.
6.
6.6.
6. Click Done
Done Done
Done when you are finished recording.
7.
7.7.
7. Remove the discs from your drives and store them in a safe place.
Making a Music Disc from Audio Files
Making a Music Disc from Audio FilesMaking a Music Disc from Audio Files
Making a Music Disc from Audio Files
HP RecordNow easily creates custom music discs from your WAV and MP3 collection
on the hard drive. Plus, the CDDB feature can automatically tag your files with such
track information as artist, album, and genre to help you sort through your
collection. See CDDB on page 58 for more information.
To make a music disc from audio files:
1.
1.1.
1. Click the Make a Music Disc
Make a Music Disc Make a Music Disc
Make a Music Disc button.
2.
2.2.
2. Click the Make a Music CD from Audio Files
Make a Music CD from Audio FilesMake a Music CD from Audio Files
Make a Music CD from Audio Files button. HP RecordNow
automatically opens your CD-Recorder drive.
NOTE:
NOTE: NOTE:
NOTE:
If you wish to use a different disc drive to read your disc, click Change
ChangeChange
Change.
(See Changing CD Recorder drives on page 61 for more information.)
3.
3.3.
3. Insert a blank disc, then click Next
NextNext
Next.
4.
4.4.
4. Click Scan for Music
Scan for Music Scan for Music
Scan for Music to have RecordNow automatically search your hard drive
for valid music files.
NOTE:
NOTE: NOTE:
NOTE:
You can control the size of audio file HP RecordNow searches for by
selecting the Hide audio files shorter than...
Hide audio files shorter than...Hide audio files shorter than...
Hide audio files shorter than... option from the Options
OptionsOptions
Options
button > General
GeneralGeneral
General tab (see Options on page 58). This feature speeds up the
search process by eliminating the short audio files such as the ones you
hear when Windows starts up or closes a program.
5.
5.5.
5. When RecordNow has located all of the valid music files on your system, you can
sort your music tracks by selecting a category from the View
ViewView
View drop-down menu in
the Music on System
Music on SystemMusic on System
Music on System section.
6.
6.6.
6. Select the tracks you want to add to your music disc using one of the following
methods:
• Select the tracks you want from the Music on System
Music on SystemMusic on System
Music on System window and click the
Add
AddAdd
Add button.
• Click the Browse...
Browse...Browse...
Browse... button, navigate to the tracks you wish to record, select
them, then click the Add
AddAdd
Add button.
• Drag-and-drop tracks from the Music on System
Music on SystemMusic on System
Music on System window on the left to the
playlist window on the right.
Product Information Drive Specifications Interfaces Installation and Configuration
Drive Operation Tips and Techniques Software Maintenance
Troubleshooting Warranty and Support Release Notes Discontinued Products