


hp dvd-writer
hp dvd-writerhp dvd-writer
hp dvd-writer
dvd100i
dvd100idvd100i
dvd100i
Technical Support Solutions Guide 10/25/01 HP DLA 2.5
69
6969
69
⇐
⇐⇐
⇐
⇒
⇒⇒
⇒
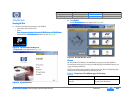
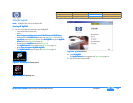
To format a compact disc
1.
1.1.
1. Open HP DLA.
2.
2.2.
2. If your system has more than one recorder you can select the drive you wish to
use by clicking the Change
ChangeChange
Change button on the left of the screen.
3.
3.3.
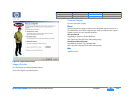
3. Click the Format
FormatFormat
Format button.
4.
4.4.
4. Place your media in your optical recorder and wait for the drive to spin up.
NOTE:
NOTE: NOTE:
NOTE:
See Eject Button on page 70 for information on ejecting your recorder
tray.
5.
5.5.
5. Click the Next
NextNext
Next button.
6.
6.6.
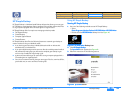
6. Set the options:
a.
a.a.
a. Type a label for the media (optional) by placing the cursor in the Volume
label box and typing the name you wish.
b.
b.b.
b. Select the Format option (either Quick or Full).
c.
c.c.
c. If desired, select Enable Compression by clicking the option box until a check
mark appears. (This compresses data with an approximate 2:1 compression
ratio.)
7.
7.7.
7. Click Next.
NOTE:
NOTE: NOTE:
NOTE:
●
Once the Format operation is started, it cannot be cancelled.
●
Media formatted with compression can only be read by a machine with HP
DLA installed.
●
Formatting a CD-R or DVD-R uses space on the media.
●
If your CD-RW, DVD-RW or DVD-RAM disc has been used by another
application, it may take HP DLA a little longer than normal to format the disc.
●
If your drive is HP Fast Format capable (see your optical recorder’s User Guide
for more information) HP DLA will automatically use the HP Fast Format
feature when performing a Full Format of your disc. This feature allows you to
read and write to your disc during the formatting process.
Make Compatible
Make CompatibleMake Compatible
Make Compatible
The Make Compatible feature makes the uncompressed data on your CD-R media
readable by virtually any CD-ROM drive.
To make your disc compatible
1.
1.1.
1. Open HP DLA.
2.
2.2.
2. Insert your CD-R disc into the drive tray.
3.
3.3.
3. Click the Make Compatible
Make CompatibleMake Compatible
Make Compatible button.
4.
4.4.
4. Click the Start
StartStart
Start button.
NOTE:
NOTE: NOTE:
NOTE:
●
Depending on the amount of information on the disc, this process may take a
few minutes to complete and cannot be cancelled.
●
When using discs formatted by Make Compatible on computers that don’t
have HP DLA installed, long file names will be shortened and directories
nested more than 30 folders deep will not be readable.
●
Discs created with Make Compatible cannot be read by computers running in
DOS mode.
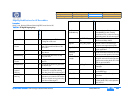
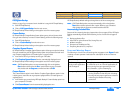
Can be performed on all CD and DVD
recordable discs
Only available for CD-RW, DVD+RW,
DVD-RW, and DVD-RAM media
Must be initially performed for all CD-R
and DVD-R media
Must be initially performed for all
CD-RW, DVD+RW, DVD-RW, and
DVD-RAM media
!
Caution Formatting a disc makes all previously recorded data
inaccessible.
Quick Format Full Format
!
Caution The Make Compatible feature closes your appendable disc
making it impossible to write further information to that disc. Do not use
this feature until you have finished copying files to your disc.
Product Information Drive Specifications Interfaces Installation and Configuration
Drive Operation Tips and Techniques Software Maintenance
Troubleshooting Warranty and Support Release Notes Discontinued Products