


57
Using DVD
The VR-509 is equipped with a function to enable the images
stored on the hard disk to be exported to DVDs.
* It is possible to export images to a DVD when recording onto
the hard disk.
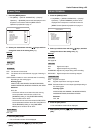
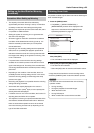
1. Press the [HDD(DVD)] button.
• The display LED will be illuminated, and the DVD
operation mode will be activated.
* It is not possible to switch across to the DVD operation
mode during HDD playback.
2. Press the [MENU] button.
• The “DVD” screen will be displayed.
3. Select [DVD EXPORT] with [S/T], and then press the
[SET] button.
• The “DVD EXPORT” screen will be displayed.
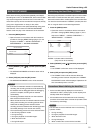
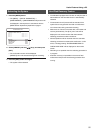
4. Select your desired item with [S/T], and then change
the setting with [–/+].
Settings
Self Playing + DVD-Video (OPT) format (gap fill-in):
The copy is made in both the self-playing format and
the DVD-Video (gap fill-in) formats.
Self Playing + DVD Video (NO OPT) format:
The copy is made in both the self-playing format and
the DVD-Video formats.
DVD-Video (OPT) format (gap fill-in):
The copy is made in the DVD-Video (gap fill-in)
format. This can be played back on DVD players. It
is designed so that gaps between images caused by
a low number of frames per second are filled in, and
it is played back at a speed of x1. This format cannot
be played back on the VR-509.
DVD-Video (NO OPT) format:
The copy is made in the DVD-Video format. This can
be played back on DVD players. Gaps between
images caused by a low number of frames per
second are played back in the fast-forward mode.
This format cannot be played back on the VR-509.
Only Self Playing:
The copy is made in a format that can only be played
back on the VR-509.
* To output linked audio sound in the DVD-Video format, either
set the [GAP FILL-IN (OPT)] parameter, or specify “25” for
the frame rate.
If the frame rate is set at 0.08 or 0.2, audio sound will not be
output even if the [GAP FILL-IN] parameter is set up.
Sets whether the date/time stamp is to be recorded on images
or not when writing is being carried out in the DVD-Video
format.
When data is being exported to a DVD-RW disc, all previous
data on the disc will be deleted. This function specifies the
method of deletion.
ALL: Deletes all data. This will require between thirty
minutes and one hour for a 4x disc.
HIGH SPEED: Deletes the data at high speed (approximately
two minutes.)
However, the data will not be completely
erased.
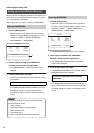
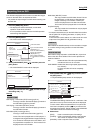
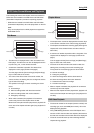
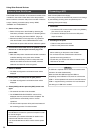
5. Select [DURATION] with [S/T] keys, and then press
the [SET] button.
• The [DURATION] setup screen will be displayed.
Duration List Area
The DURATION setting enables lists for a maximum of 99
periods to be set up. Lists for three periods are displayed
on each screen. When the parameters for one period list
have been completed, press the [T] key to continue with
the setup of the next list. The list number in the DURATION
LIST AREA will also be increased accordingly.
Button Area
[EDIT]: Used to amend the period list settings.
[CHECK]: Used to calculate the capacity of the set lists.
The number of chapters is also displayed.
[EXPORT]: Used to export the data to a DVD.
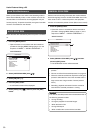
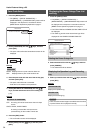
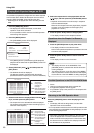
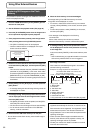
Exporting Data on DVD
EXPORT FORM
DVD MENU
DVD INFORMATION
DVD PLAY ..
DVD EXPORT ..
CANCEL DVD EXPORT
STATUS ST-BY
MEDIA TYPE DVD-RW
DISC FORMAT
SELF-PLAYING+DVD-VIDEO(OPT)
DVD drive status
Aborts the DVD export procedure.
Type of media inserted
(displayed as [–]
when no media inserted.)
Type of disc inserted
(displayed as [–]
when no disc inserted or
an unused disc is inserted.)
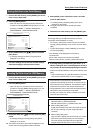
3.
DVD EXPORT
EXPORT FORM
DURATION..
TIME DATE
SELF-PLAYING+DVD-VIDEO(OPT)
ON
ERASING METHOD
HIGH SPEED
4.
5.
TIME/DATE
DELETE METHOD
DURATION
01
EDIT CHECK
EXPORT
2005 / 10 / 01 10 : 01
2005 / 10 / 01 10 : 59
INPUT :
01
TYPE : ALL
INPUT :
09
TYPE : ALL
02
2005 / 10 / 01 10 : 01
2005 / 10 / 01 10 : 59
03
20
20
INPUT :
2000MB [99]
DEL
2000MB [99]
DEL
MB [
] DEL
TYPE :
Duration List Area
Button Area