75
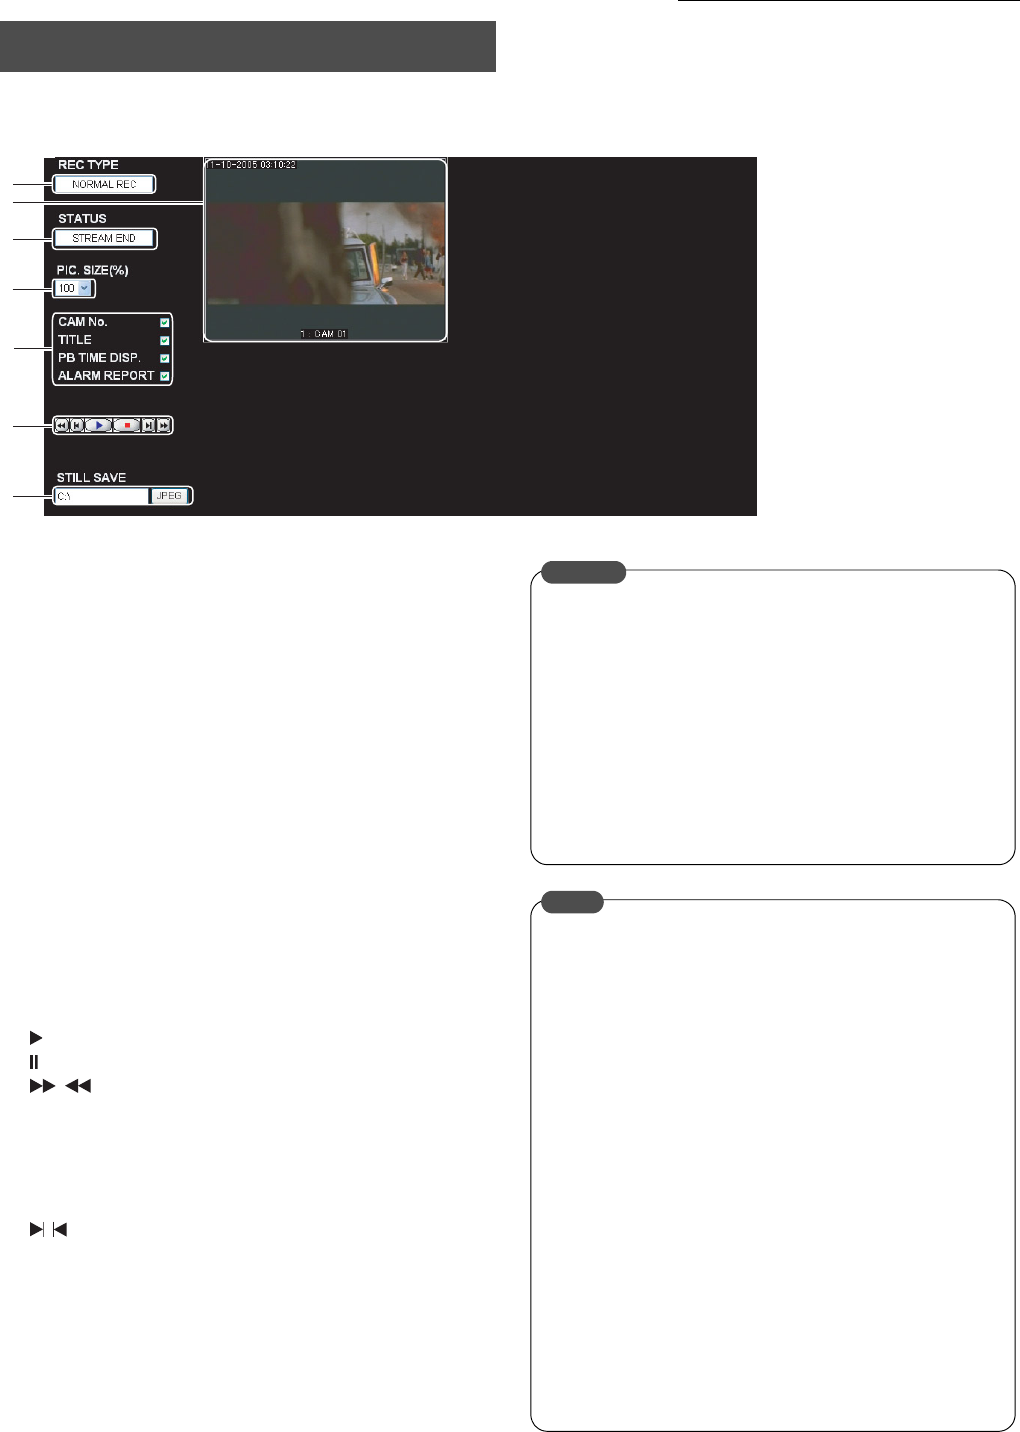
Viewing Playback Image Using a PC
1. Executes either the “ALARM SEARCH” or the “TIME/DATE SEARCH”.
• The Playback image display screen will be displayed.
1. Live Image Display Area
Displays live images.
2. [REC TYPE]
Displays the recording mode.
NORMAL, TIMER, ALARM, etc.
3. [STATUS]
Displays the playback status.
TOP, END, -x5, ..., -x1, PAUSE, x1, ..., x5
4. [PIC SIZE (%)]
Selects the size of the display.
5. Display Information
Selects whether or not information is to be displayed.
CAMERA NO., TITLE, PLAYBACK TIME, ALARM
REPORT
6. Operation Buttons
: Normal playback.
: Playback is paused.
/ : Search playback in the forward or reverse
directions.
The search playback will be performed at x1
speed with one click, x3 speed with two clicks,
and x5 speed with three clicks (the speed will be
displayed in the operation status display area.)
/ : Skip playback in the forward or reverse directions.
7. [STILL SAVE]
It is possible to capture still images.
Enter the name of the folder in which data is to be saved on
the personal computer in the text box, and then click on
[JPEG]. The still image will be stored on the personal
computer. The name of the image is automatically allocated.
(See Still Image File Names on page 62)
* Add “/” to the end of the folder name in which the file is to
be stored.
Playback Image Display
2.
7.
3.
4.
5.
6.
1.
• A message stating “No response from the VR-509” will
be displayed if the playback display window is opened
with a window opened on the live display screen, but
this is not a malfunction.
• Close the live image display window if it is open. There
are cases where playback will fail if it is started
immediately after closing the live screen. Leave a small
amount of time between switching from the live screen
to the playback screen.
• The playback window will be initialized whenever the
[TIME/DATE SEARCH PLAYBACK] search is run.
CAUTION
Registration Functions for the Name of the Folders in
Which Still Images are Saved
This is a convenient function that remembers the details
entered into the save still image text box to simplify the
procedure the next time an image is saved.
Preparations
1. Click on the [Tools] → [Internet Options] → [Contents]
→ [Auto-Complete] buttons on Internet Explorer with
the mouse.
2. Add a tick to the [Form] column check box.
Registration
Enter the name of the folder that is to be registered in the
save still image text box, and then press the [ENTER] key
to register it.
Selecting folders that have had names registered
Double-click on the left-hand mouse button over the save
still image text box to display a pull-down menu of the folder
names that have been registered before.
Select the required folder name from amongst those
displayed.
MEMO
